As of June 30, 2022, Ducatiunveiled the V21L MotoE bike in Modena at a small and private event. Even though the event was only open to a select group of European journalists. They now get to tell the rest about their time at chef Massimo Bottura’s bed and breakfast.
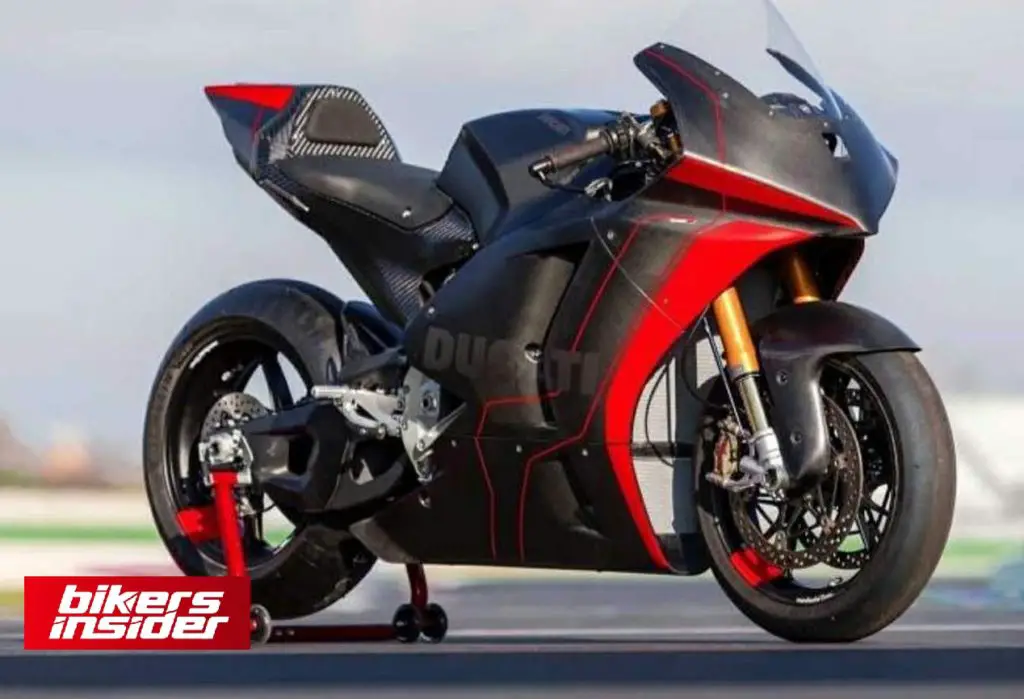
Looks like the V21L prototype that Ducati has been testing based on the photographs shown earlier this morning at the show. Of course, the paint job is a little more sophisticated. While some carbon fibre is covered, others are left exposed to show off their particular grain. It creates a visual texture that our eyes may feast on.
ducati motoe v21L
You feel the energy while looking at the red line graphics against the matte black/dark grey background. As a result, the V21L from Ducati doesn’t immediately scream “electric motorcycle,” as we’ve come to expect from other entries in the category. The V21L’s visuals, even if you had no idea what they were before viewing them, may lead you to believe it’s a weapon.
Build and Specifications
What more information do you have about the MotoE bike from Ducati? over 496 pounds, this first-generation model seems to weigh 225 kilograms. The 110 kg(242.5 pounds) battery is an 18 kWh device. The design is to suit this bike and attach to the swingarm. The battery is accountable for a large part of the weight.
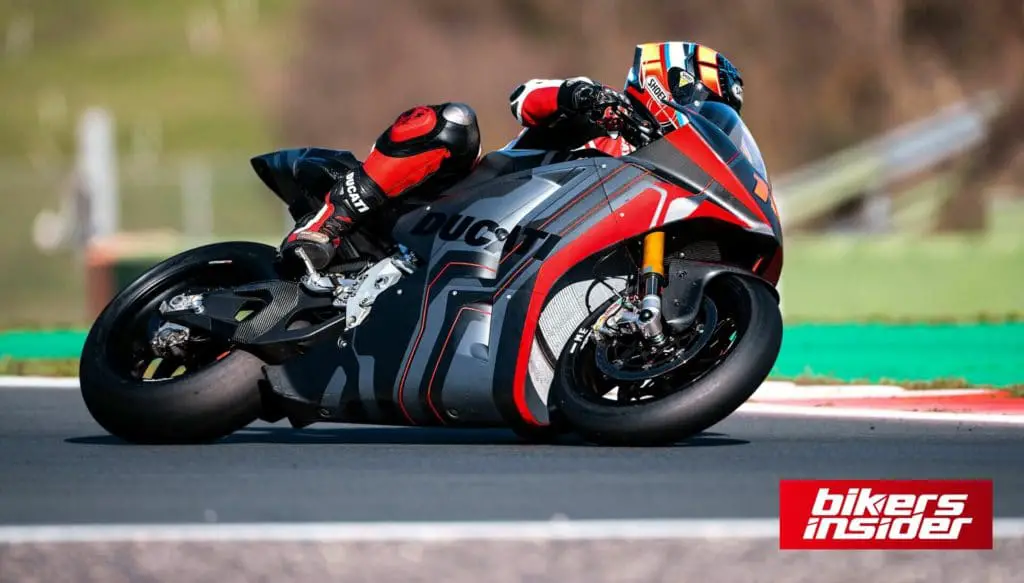
Is there anything else you’d want to add? The greatest output is 110 kW or 150 horsepower, and 103 pound-feet of torque as per specifications sheets. A high speed of 171 mph has been claimed in Mugello. It has completed seven laps of a GP course that Dorna wants for its MotoE races.
ducati motoe v21l on track
Also crucial are hlins NPX 25/30 pressurized forks with 43mm upside-down tubes adapted from Superleggera V4. Besides, an adjustable hlins steering damper and an adjustable TTX36 rear shock are included. Brembo brakes with cooling-optimized designs are also a component of this concept.
Among Ducati’s claims about its cooling system is that it has a double liquid cooling circuit to handle the cooling requirements of both the battery pack and the motor and inverter. As a result, once the bike is hot off the track, Ducati maintains there’s no need to wait to charge it. A full charge will be in approximately 45 minutes if it is put straight into the wall socket. ‘ Also, the lessons Ducati is learning for the MotoE project will be applied to future production bikes.
Expected production
To be clear, Ducati’s R&D director Vincenzo De Silvio said the following when speaking about this undertaking: “Ducati’s participation in the FIM MotoETM World Cup is not only a technologically exciting try, but also the best way for the company to interpret the challenges of the new millennium. Motorcycle racing is an ideal environment for testing and refining new innovations before the features come into mass-produced motorcycles “he stated.
“Current issues in this subject revolve around battery capacity, weight, autonomy, and the availability of charging infrastructure. The knowledge gained by Ducati in the FIM MotoETM World Cup will be invaluable in the company’s product development efforts, as will the physiological changes in technology and chemistry. It’s already critical for the company’s internal knowledge to expand now so that it can be ready when the first street electric Ducati is put into production.”
For more news and updates keep visiting BikersInsider.
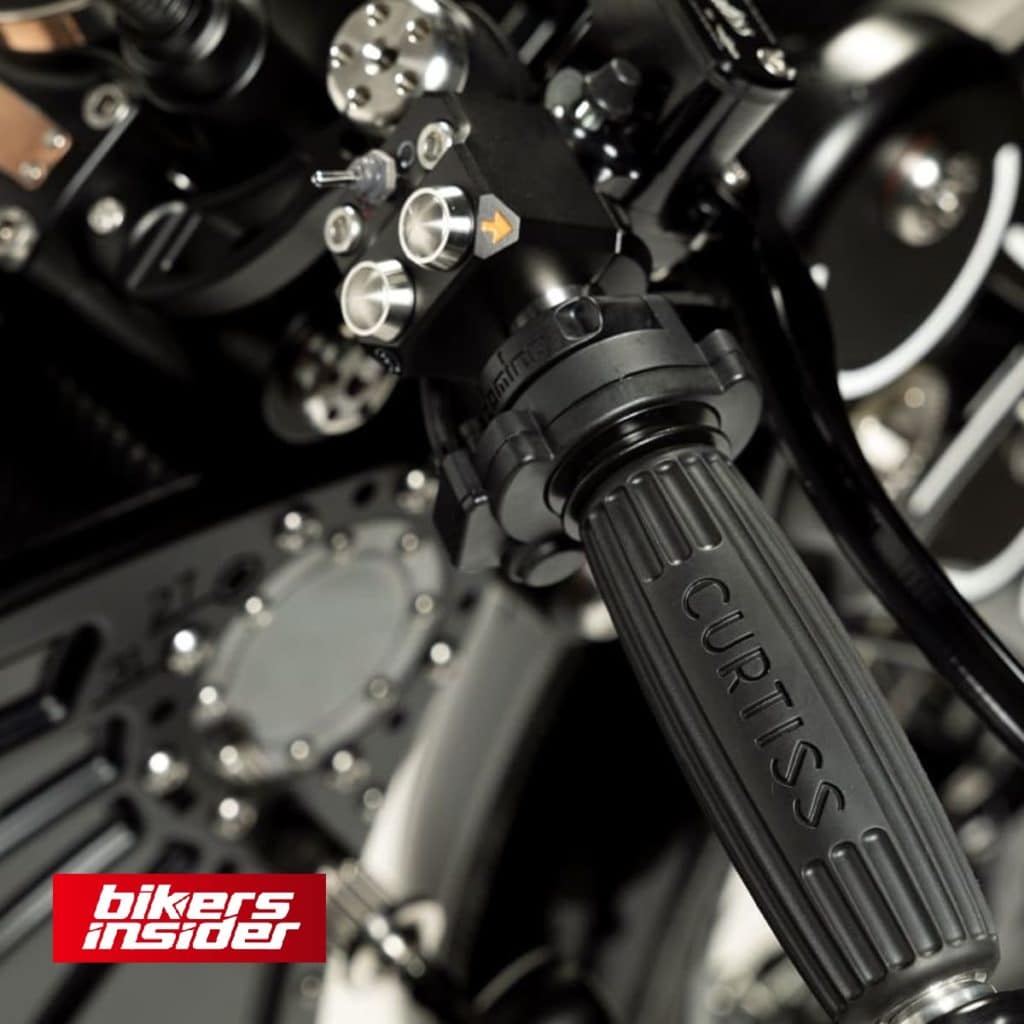
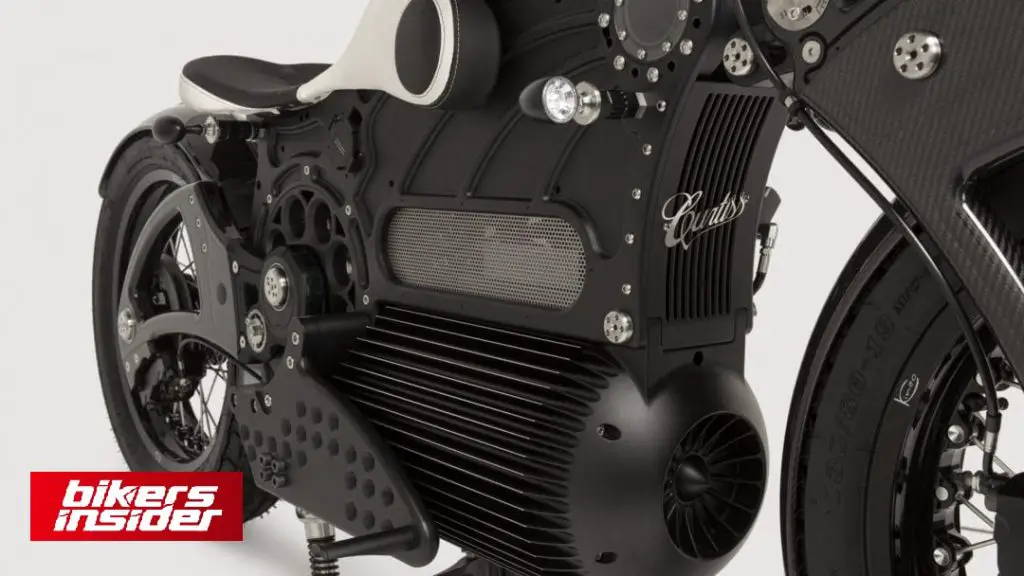
It has been announced that on June 29 at 9:00 a.m. Eastern Standard Time, Curtiss Motorcycle Co.’s documentary, The Opposite of Death, will air on the company’s website and YouTube channel. Curtiss Motorcycle Co. makes the handmade electric motorcycle known as The 1.
The build of Curtiss one is with high-end materials
This film explores the resurgence of the brand and the development of The 1. All these people will be on hand to provide their thoughts and opinions on the future of The 1 and the company’s other products.
To provide an “analog electric experience,” the Curtiss 1 will come without an engine. It means no engine heat, no noise, no phone connectivity, and riding modes. That part of your brain which remains occupied by feeding an internal combustion engine is now free to think about everything else. Thus, everything else matters more,” explains lead designer Nesbitt. As far as we are concerned, ergonomics and suspension are more important.” With its unconventional design, this motorcycle concentrates on the rider-centric idea. Ergonomics, seating position, ride height, and the suspension’s multi-link links are adjustable.
Curtiss The One branding
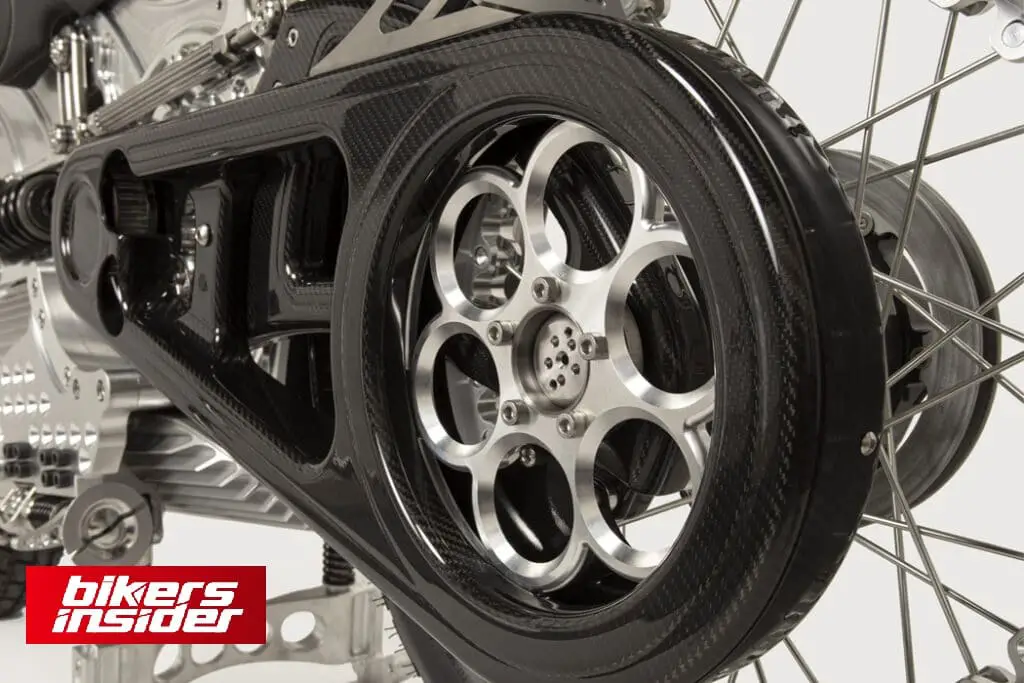
An immersion-cooled Curtiss Hex Pack battery and a unibody body dripping with high-end materials like billet aluminum, titanium, and carbon fiber contribute to the 1’s balance. It also boasts a patent-pending Centered Power Axis. The USD 83,333 MSRP for a hand-built, configurable electric motorcycle like this is a lot of money. Curtissmotorcycles.com is now accepting preorders for the 1 model. The expected release of the bike is in June 2023.
Curtiss The One Electric Motorcycles chassis
The 1 production prototype will be on display at the Petersen Automotive Museum in the “Electronic Revolutionaries: Designers at the Edge” exhibit until February 2023 for anyone in the greater Los Angeles region.
The opposite of death
The full-length documentary will air on Curtiss Motorcycle’s website and YouTube channel on November 29, so check back for a sneak peek. Keep visiting BikersInsider for more news and updates.
You’ve planned a trip, but you’ll also need to pack some gear on your bike. At this stage, you’ll need a motorbike travel bag (or bags), and there are several options to select from. Aside from deciding on the bags you need, you’ll also want to figure out how you’re going to attach them to your bike and how much space they’ll take up.
You’ll have to keep your bike’s capabilities in mind to do this successfully. When it comes to packing for a sportbike, you’ll need a different strategy than when it comes to a sport-touring bike, for example. As a starting point, we’ll discuss the best travel bags for motorcycles in 2022 and discuss their advantages and disadvantages.
You can just see the summary for your required bag in this compilation of the best travel bags for motorcycles in 2022 if you are in a rush.
Bags can have a hard shell or a softshell, be waterproof or not, be locked or not, or be permanently mounted and then removed at will. How much gear you’ll need is mostly determined by where you’re going to ride, the bike you’re riding, and whether or not you’re comfortable leaving your bags on the motorcycle while it’s parked.
Hard shell bags
Hard bags are available in all the primary types of designs discussed above. The build is of hard plastic or, in cases of required, metal such as aluminum. Besides, hard bags are more likely to be weatherproof and lockable. Many will, yet, be bolted to the bike and will be tough to remove for transit.
In certain circumstances, the extra mounting gear may be necessary. Unless motorcycle comes equipped with racks for luggage already fitted. Hard motorcycle travel bags are also more bike-specific. They need to ensure adequate clearances and fitment, but universal options are available.
Soft shell bags
A wide variety of styles and materials are available for soft bags. Ballistic nylon, waterproof vinyl, leather, and various composite materials are available. All kinds of luggage (including sissy bar bags) can be found in these materials.
Softshell bags have the advantage of not needing any extra hardware to keep them attached to your bike. In some cases, magnets feature to hold the bag in place, and tie-downs or straps come with the bag. Rigid inserts are common on many of the bags in this category. Which keeps the bag’s shape and allows you to see what’s inside more.
Backpacks
Of course, these aren’t your only alternatives. When you consider the wide variety of motorcycle-specific backpacks on the market. Motorcycle backpacks, like the bags above, do come in materials meant to endure the impact. They provide waterproofing in and sit on your body when in the ride position.
Best travel bags for motorcycles in 2022
We have compiled a list of the best travel bags for motorcycles in 2022 for you to choose the best for your next trip. Though this list of the best travel bags for motorcycles in 2022 can be very subjective for all. You might be able to find a better one for yourself, so without further ado, let’s start.
1. Biltwell EXFIL-80
Having a lot of things with you is another matter entirely. Another is to have everything arranged and packed neatly. The Biltwell EXFIL 80 can contain all of your motorbike gear and keep it tidy at the same time, making it an ideal travel companion.
You can also rest your back on the spacious external tool compartment, padded on the outside. Simply unzip the bag without removing it from your bike to access your tools and other small stuff.
The tool compartment has nine deep sockets, seven combination wrenches, a mesh pocket, and a flat document holder. The bag itself is UV-protected and water-resistant, with a capacity of 55 liters.
Biltwell EXFIL80
A waterproof sleeve is stashed away in one of the pockets if you need further protection from the weather.
This sturdy moto-ruck is designed to accommodate all of your belongings so that you may travel and camp from your motorcycle for days at a time. Add-on features include a cushioned exterior on the huge external tool compartment.
Simply unzipping this part lets you get to your tools without having to remove the backpack from your bike. Just open the zipper behind the tool compartment, pull out the associated waterproof sleeve and slide it over the entire system when you require complete waterproofing.
In a rather Biltwellian way, the bag’s capacity is calculated. The Exfil-80 can contain up to 80 12-ounce cans of compressed air. There are a lot of variables at play when it comes to preparing for a typical road trip.
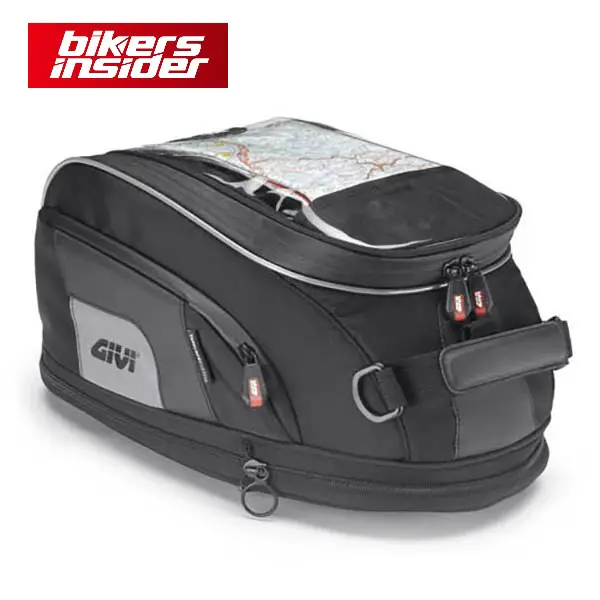
The Givi XS307 XStream Tanklock has a 15-liter capacity, a perfect medium ground between larger and smaller tank bags. It’s designed to work with Givi’s TankLock system, which consists of an aluminum ring that fits around the gas cap, and has a plate on the top that clicks in to keep everything in place.
givi-xs307-tanklock-15l-tank-bag
When it’s time to remove the bag, simply pull on the pull tab on the side. Allows for a simple and secure platform for the tank bag without the need for magnets or straps. When it comes to the tank bag, you may either keep it compact like you see in the image above, or it can stretch to its full 15-liter capacity to accommodate even greater loads.
Rugged 1200D nylon with waterproof zippers (a hi-viz cover can protect the entire thing from the elements). The backpack comes with a shoulder strap and media ports so you can attach your devices to the bag when you’re not riding your bike.
Map holders are available for those who prefer to go old school and still utilize paper maps. With the touchscreen display, you can still operate your GPS when it’s in the holder.
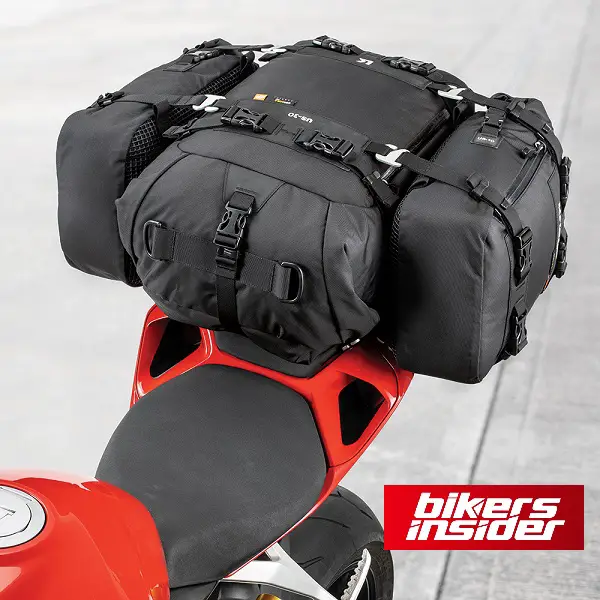
Weekend rides on a sportbike or sportbike are still popular among motorcyclists. The Kriega US-30 Drypack exists because of this. Besides the 30-liter model shown above, it’s also available in larger and smaller sizes.
Although it works on any motorcycle, sporty bikes benefit the most from its use. Bike subframes or seats are attachable to the 100% waterproof bag, and you can also mount it.
Kriega US30 Drypack
It is possible to carry the US-30 on or off the bike with detachable shoulder and waist straps. Four quick-release buckles on the pack make it simple to put on and take off the backpack.
Tailback combinations of up to 90 liters may carry without straps thanks to US Alloy Hook Straps. Alloy hooks CNC milled from plane quality 6061-T6 alloy attach to four discrete web loops. It attaches the bike’s sub-frame, suitable for traditional one-piece motorcycle seats. Both inline and across-the-seat mounting options are available.
Classic soft saddlebags in the style of the TourMaster Select series are a nice example. Each bag has a 12-liter capacity, so you can pack a lot in there from the best travel bags for motorcycles in 2022.
The adjustable mounting yoke is built of 600D Carbolex and 1680D ballistic nylon. It can be permanently installed under select motorbike seats.
Tour Master Select Saddlebags
Neoprene layers that are built are removable, protect the motorcycle from scratches. It is an easy-to-open hinged cover that offers access to the main compartment. When getting off the bike, the provided carrying handles make it easy to carry the contents of the external pockets with you.
Besides, a rain cover comes in the pack. Even when the bag is empty, interior panels provide support and maintain the bag’s shape. Internal panels are an excellent design feature. The TourMaster Select tail bag was developed to complement the panniers. If you need more storage than the 24 liters the saddlebags supply.
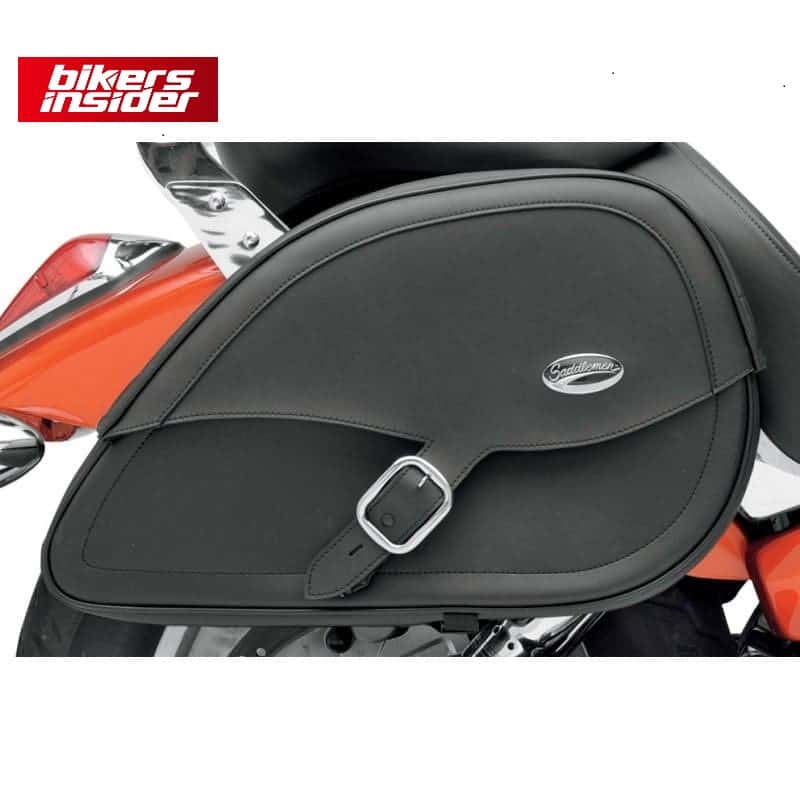
As a teardrop-shaped saddlebag, it’s a fantastic match for today’s cruisers, and the sleek design lets you use the standard turn signal placements. Solid mounting brackets and hardware come in these bags for most popular cruisers, including difficult-to-fit forward-mounted turn signals. These bags are on our list of best travel bags for motorcycles in 2022, best suitable for Harley fans.
Allows you quick access to the bag’s interior area and frees up your hands for loading goods thanks to the forward-opening lid.
Saddlemen Teardrop
Zippered yoke attachments allow the bag to be swiftly removable, and mesh pockets inside the bags are great for storing maps. It even comes with an easy-to-carry handle! Lockable twist-lock closures and padlocks come standard on each bag to ensure the safety of the contents.
The jumbo bags have dimensions of 20′′ L x 12′′ D x 6.5′′ W, while the ordinary bags are 18′′ L x 10.5′′ D x 5.5′′ W.
YKK semi-automatic zippers separate the bag’s two large chambers. Each with a size of about 25 liters. The zippers work and are quite useful. With a soft inside lining, the computer compartment holds laptops up to 15 inches in length.
As a bonus, the compartments are organized so that we may keep our possessions safe and orderly at all times.
An elastic waterproof case with its own pocket protects the bag from getting wet, also in the main compartment’s fleece-lined pocket for the smartphone. There are two front pockets, one of which is waterproof and the other is not.
The helmet holder fits into a compartment on the City Hunter. There are hooks on both sides of the bag, where it says “helmet carrier,” in the red tapes. Helmets of various sizes can be carted using this holder.
Alpinestars city hunter-backpack
The shoulder straps have perforated foam inserts and mesh panels for most airflow. It reduces sweating when carrying the bag, especially if it is full. Fast and safe adjustments are there with Quick Release.
Because of its anatomical design and eight 15 mm foam cushioning pieces, the aircraft’s back panel relieves pressure on the spine while providing good pilot comfort and distributing weight. Its design allows the greatest airflow and keeps the back cool, like the shoulders.
Reflective elements on the backpack’s front and shoulder straps make the rider visible in low light.
Also, the handle’s neoprene-like texture makes moving it a breeze, allowing us to carry it with ease.
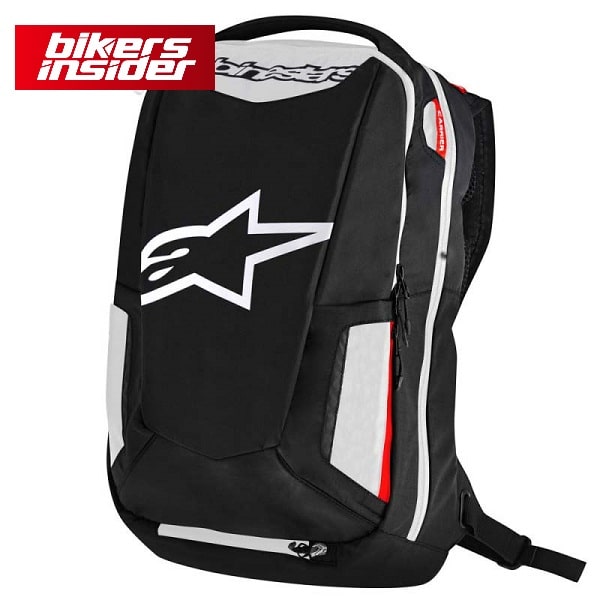
The Alpinestars City Hunter bag features a well-organized storage system. Its aerodynamic contour and ergonomic straps design distribute the bag’s weight. It’s possible to get this bag in as many as four different color schemes.
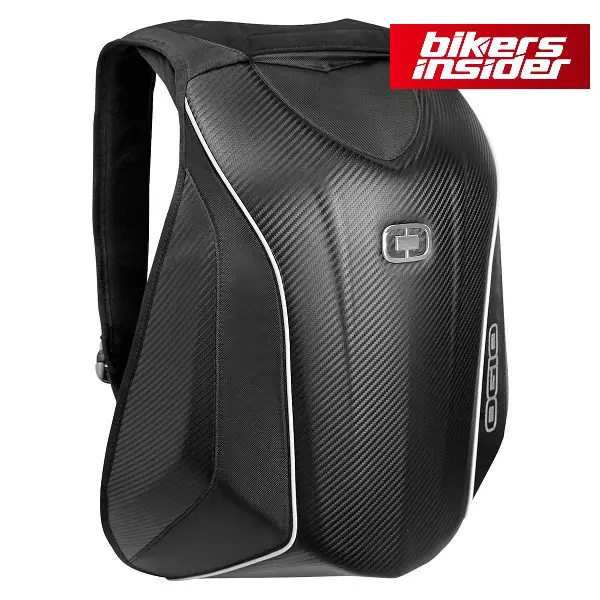
Ogio is a well-known and innovative brand for motorcycle bags in this list of best travel bags for motorcycles in 2022. They supply a variety of useful baggage assortments for everything. It ranges from helmet bags and gear cases to travel cases, hydration packs, and backpacks. The No Drag Mach 5 is their most expensive backpack. For riders. It is recognizable because of its hard plastic outer shell and aerodynamic design.
OGIO no drag Mach-5
The big main pocket contains adjustable load dividers. A premium organizer panel with stretch mesh dividers. It features a fleece-lined hip accessory pouch that is removable for more space. More features include padding for the helmet and an expandable. U-shaped gusset for more storage space. The ergonomic design of this fully-loaded Mach has a laptop sleeve and a separate shoe case.
The fact that if you wear size 13 shoes, which may fill a tiny saddlebag, means that you’ve never been excellent at packing, no matter how many motorbike trips you’ve had.
Remove soft luggage to free up space. Use the seat or tail bag alone or with extra luggage if you want to keep things simple. The best baggage includes an easy-to-use mounting system, expandability for additional luggage, and a stylish design to match your bike.
It is safe and reliable. When the bag is enlarged from 20.5 to 27 liters, internal stiffeners with fold-up flaps hold it in place.
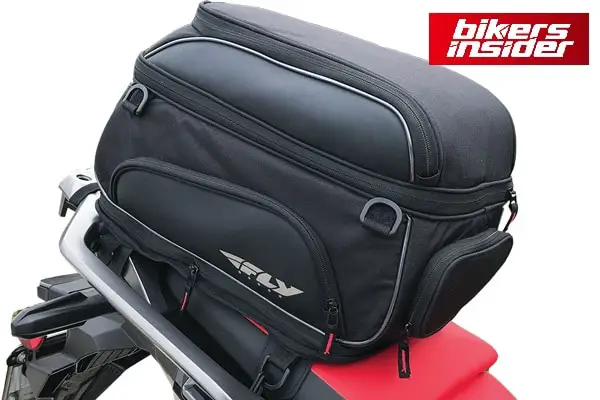
Fly Racing tail bag
The Fly Racing Tail Bag is best for a passenger seat/luggage rack. You may alter the length of the straps using a simple strap retainer instead of bungees or quick-release fasteners.
Then it’s just a matter of loading everyone onto the bike and fastening the bag. It zips open from the bottom.
To keep the paint safe, they attach plastic rings to the bottom corners of the foundation. The bag has four more top loops and a key holder. Reflective piping and branding adorn the black bag’s side zippered pockets and organizing compartments within the lid, with a rain cover and a shoulder strap.
If anything, Fly Racing offers a two-year craftsmanship and material warranty on its base and top zippers. It’s cost-effective, adaptable, large, and safe. Tail bag is available for $109.95.
The 56-liter capacity of the Givi Maxia makes it one of the largest top boxes available. Two helmets, some clothing, and a few other bits and bobs will all fit just fine. If you need a lot of space, this case is a good investment. It’s not much more expensive than the smaller Givi top boxes.
The design of the top box is as expected from Givi, and it’s a great touch. It contains a document holder and elastic straps for keeping things in place. The handle is foldable into the case itself.
Givi V56N Maxia
Thanks to a hinge mechanism built into the top, the lid can remain open while you are loading it. The case’s top box is rapidly detachable as large luggage.
If you don’t have a key, you could accidentally lock your keys in your Givi Maxia, which is my sole gripe.
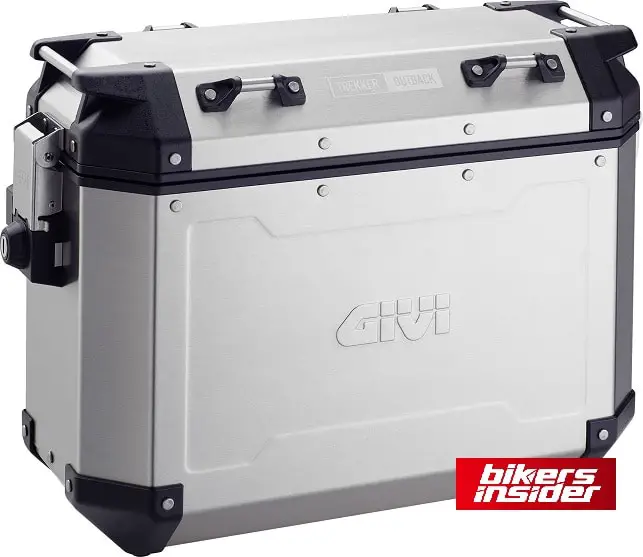
Like other Givi models, the Outback series is semi-customized. While the bags themselves are modular and adjustable, the luggage mounts are bike-specific. From the back, the 2007 BMW R 1200 GS would appear unbalanced if it had the same-sized panniers on both sides.
The 48-liter box on the right, and the 37-liter box on the exhaust side, are preferred by some riders. The distance between each box and the bike’s centerline is equal.
Givi’s heavy-gauge tubular mounting rack for the oil-head GS may fit in a matter of minutes. The racks are on their standard design, but they’re a little more robust. The Givi rectangular box point is included.
Givi Trekker Outback
They attach to the existing mounting tabs and frame tubes. Since the mounting surface must be outside the GS exhaust. Some riders may find the left bias unbalanced. Of course, this isn’t an issue with twin or under-seat exhaust bikes.
Most adventure motorcycles can enjoy the Trekker Outback line’s side panniers and top boxes. Givi’s new aluminum-alloy dual-sport luggage is excellent. High-quality materials and thoughtful design go into these items.
It’s priced at other high-end aftermarket storage options of similar quality. Several Internet sellers offer the luggage (two side boxes and amount) for a reduced price.
Kuryakyn’s Momentum Freeloader sissy bar duffel bag has a unique quick-mount strap design that quickly connects to practically any sissy bar or backrest and can contain a lot of stuff — 2,375 cubic inches of goods (when completely expanded).
Kuryakyn Momentum Freeloader
The top-roll design of the primary storage compartment provides maximum carrying capacity while also providing security for all of your cargo.
In bad weather, the 1200 denier fabric has been coated with UV protection and comes with a rain cover. It’s easy to fit clothes or other loose items like a sleeping pad or blanket into the front of the bag using the bungee cords. There’s also a shoulder strap and a carrying handle, so you can take your gear with you when you leave the bike.
Many bikes do not come equipped with dedicated storage areas for luggage. To transport additional clothing, water bottles, lunch bags, and other things on an overnight or even day vacation, you’ll need a storage solution.
Suppose you ride a BMW, Honda, Harley-Davidson, Kawasaki, or any other motorbike brand. In that case, a tail bag is an excellent option. If you’re looking for a way to keep your gear safe while you’re out and about, a bike rack is an excellent option.
Here we conclude our list of best travel bags for motorcycles in 2022. See our purchasing guide for some of the top motorcycle accessories at BikerInsider.
Frequently Asked Questions (FAQs)
Why do I need a motorcycle bag?
It might be unsafe and inconvenient if the bag is not meant for motorcycle riders. The bag could potentially injure the rider’s spine if he or she falls. If a rider falls, the pack may trap on the rider’s spine and twist it, or the objects in the bag may inflict injury. Furthermore, many backpacks aren’t ergonomic, causing imbalances or discomfort when worn for lengthy periods.
How to carry a laptop on a motorcycle?
Get a good, waterproof pannier and rack for your bike. Rectangular pannier bags for files, laptops, and other items are easy to come by. In a properly closed bag, with a decent cover, pockets, and so on. You can also get a decent backpack from Biltwell, Alpinestars, or OIGA.
What does a motorcycle box call?
One of the most common types of motorcycle luggage is panniers, which are also known as saddlebags or motorcycle bags. These are made comprised of two containers with a strap connecting them. Typically, this type of luggage is draped across the frame, with one container next to each rear wheel.
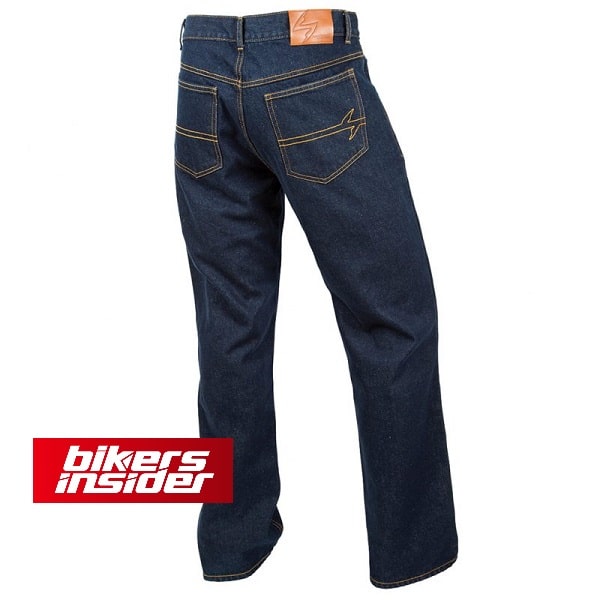
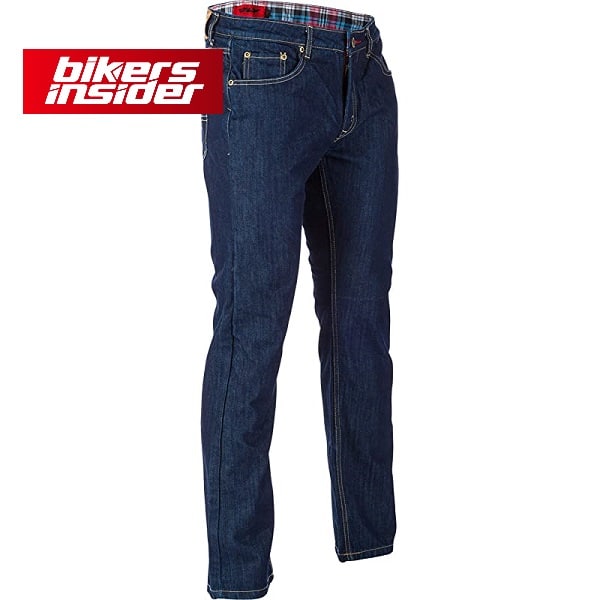
Riding pants are the most underrated item of motorcycle safety gear. Wearing full leather or knee-puck track trousers on the road may seem like overkill. Protecting your legs from hits and abrasions is essential if you end yourself in an accident. Sports denim pants are the most excellent solution to this problem.
They provide enough protection while maintaining the look and feel. This standard look-alike pair of denim pants while you are off the bike.
Even though they’ve been around for a while, moto–specific riding jeans now come in well over 100 various styles. It includes cuts, colors, and materials. This provides consumers many options and complicates the search for the few great pairs that are clearly the best Kevlar jeans for motorcycle riding out there. In this roundup of the best kevlar jeans for motorcycle, we’ll focus on the selected best kevlar jeans for motorcycle riding available in the market.
If you are short on time take a look at the summary table of the 9 best kevlar jeans for motorcycle riding in 2022.
The material of the denim is Cordura 373 GSM (85% cotton, 15% nylon) fabric, which looks and feels like washed denim. There is DuPontKevlar from the waist to the knee, while the denim consists of mesh from the knee to the ankle for added comfort. A reflective silver strip hangs just above your heel if you roll your jeans, which provides additional nighttime protection.
The hip and knee armor is available separately for the Covert Pro jeans. Fractures are the last thing anyone wants to see due to a spill.
Scorpion EXO Covert Jeans
The Scorpion Covert Pro jeans are just like proper jeans. Besides the luminous cuff, they resemble a pair of casual blue jeans, making them ideal for riding. The cut of the jeans on the Covert Pros annoys many riders. For those who prefer to put on their shoes first, these are the jeans to choose from. Although the waist and thigh area fit well, the cut below the knee is too wide and baggy.
Everything about these Scorpion Covert Pro jeans is top-notch. In addition to being comfortable and well-made, this denim can also be heavily armored. Also, as it is winter, You can use the extra layers of Kevlar and mesh lining to keep you warm. When it’s 40 degrees celsius outside, this could be a disadvantage.
On the other hand, the tried-and-true Kevlar option should get appreciation. Aeronautical technology may use novel textiles, but new does not always imply superior. Scorpion’s Covert Pro Kevlar-lined denim pants are an excellent option if you’re looking for inexpensive jeans.
Many manufacturers are now offering single-layer denim solutions, which would lead you to believe that Kevlar-lined denim was a thing of the past. However, this is not the case.
The Scorpion Covert Pro jeans have made riders rethink their decision to fork out $130USD for the latest tech fabric riding trousers. Because these single-layer riding jeans feel like sandpaper compared to these Scorpions.
Dainese’s high-performance racing leathers, boots, and gloves are what most people think of “Dainese.” Vincenza-based firm, of course, combines excellent construction with exquisite Italian flair. The Tex Pants still live up to the brand’s great stature despite their useful appearance.
The Chinos use a single-layer Armalith fabric made of cotton. It uses Lycra and Ultra High Molecular Weight Polyethylene (UHMWPE) fiber.
The Chinos‘ weave is robust but pleasant to the touch. The pants do not need a belt to sit on the hips. Ankle protection is still provided by an ankle-to-knee extension hem on the flexible knee armor. Aside from the CE AA certification, the full coverage offers extra peace of mind by ensuring the rider’s protection no matter what.
Although they had a slim fit, the Chinos did not bunch up or pinch when on a bike. Having worn the pants many times, the rider can concentrate on the task because they feel like a second skin.
Dainese Tex Pants
The internal armor compartments also prevent the protectors from shifting. Even when they’re on or off the bike, whether hanging, riding hanging around. While offering protection, the knee and hip armor designs will be as cozy as possible for the rider.
Despite the knee protectors‘ flexibility, the armor takes on a flat shape when the rider is not on a bike. The flat discs at the knees of the Chinos immediately hint at the riding use. Most commuters and casual riders favor riding jeans for their adaptability and discretion.
When wearing the armor while seated, the lack of rigidity causes certain curves to appear at the knees. The Tex Pants’ blend of casual and technical attire will work well in most riding conditions. These chinos will also meet the bars of social events and workplace dress standards. Of course, these are minor niggles that some shoppers will overlook.
Dainese’s Chinos Tex Pants aren’t your casual Friday khakis. Even though its thin fit, five-pocket design, and unparalleled fit and quality. Armalith–resistant fabric and Pro-Shape 2.0 knee and hip protection feature into a tempting and comfy package. While Dainese’s Chinos cost a hefty $309.95, they’re worth every penny.
It is because of their build quality, robust protective features, and classic Italian design.
When it comes to safety and style, it’s not always easy to find the right balance. Not only are you concerned about protecting yourself from the sun, but you’d also like to appear presentable.
People who think fashion and safety are mutually exclusive choose full-gear or jeans and boots as their uniform of choice. Wait! With Klim’s K Fifty 1 Jeans, you can keep yourself safe without anyone noticing.
One of the best Kevlar jeans for motorcycle riding on this list and available in the market, the Klim K Fifty 1 has a peculiar name. These pants include a Cordura outer shell with Kevlar reinforcement panels in the areas where they are most likely to slide.
The hip and knee portions of the K Fifty 1 Jeans come with D3O armor. Klim has improved the knees by adding armor and adjusting the knees. You will get well protection in the knees and hips, and the butt–pad is decent.
KLIM K Fifty 1 Jeans
If you want protection without looking like a “dookie” in your underwear, this isn’t it (or at least not a big one). The K Fifty 1 Jeans make a pair of jeans that resemble high-quality denim, rather than the weird black sweat pants that some Cordura jeans end up looking like.
James Dean’s K Fifty 1 Jeans don’t have complicated stitching or branding to give them a James Dean vibe. On long rides, the crotch bunching is no longer an issue.
You may rest easy knowing that as long as you keep the armor on, you’ll be protected until you attain your goal. Of course, you’re still wearing armor, and as you walk, you’ll be able to see it on your legs.
Ventilation is a problem with Kevlar-lined Cordura pants. However, if you’re not stuck in traffic for a long time, they’re fine up to 85 degrees.
The K Fifty 1s, with their mesh lining, is the most comfortable pair of Kevlar jeans You’ll ever wear. However, they are cumbersome, and when the temperature rises, you will notice this.
After utilizing Bohn Armor, there is a need for further padding. This pad should be used beneath any pants and includes more padding than you can shake a stick at. So, the K Fifty 1s have become my new favorite shoe. I can wear them to work without fear of strange looks or a 15-minute changing period and still get the maximum amount of protection.
When it comes to design, Klim has taken a step forward by eliminating the usual logo blasts, strange stitching, and stretch panels. This is a simple, well-made pair of pants on and off the bike. It’s a little expensive at $289-$299, but Klim has done an excellent job.
The Spidi J & Dyneema Tracker jeans are lightweight, easy-to-wear pants with excellent abrasion resistance that won’t break the bank for city riding.
J & Dyneema’s regular 5-pocket J & Dynema jeans weigh in at 13 ounces and have the same level of abrasion resistance as leather. We’ve never seen a black single-layer pair of jeans before, so this is unusual.
Dyneema is the name of material they use in jeans. We now have a UHMWPE brand called Dyneema, a type of polyethylene (ultra-high-molecular-weight-polyethylene). The world’s most vital, longest-lasting, and lightest fiber, it’s no wonder. Because of its slight weight and high strength-to-weight ratio, it can float on water.
The Spidi jean incorporates a small amount of elastic to create a pair of pants that are lightweight, abrasion-resistant, and easy to ride in. Slim is the best way to define the fit. The jean has CE-approvedknee protectors that have been tested and found to fulfill what is known as the AA standard.
In men’s clothing, the primary issue is that pants are ordered mainly through waist size. Consequently, for those of us with less athletic proportions, a 34″ waist is believed to be matched by a 32” leg length – not the 29“, which is roughly 5’6″.
The rest of the fit is excellent, except that the leg is a little too long. Thanks to the adjustable knee armor, there are no unsightly bulges or drooping groins found in this product’s waist and groin fitting areas. Though I found the back pockets to be relatively low on the bum, this is due to the style of the pants, not a problem with the fit.
Interior lining is absent from the J&Dyneema, unlike other jeans we’ve recently examined. Denim fabric is woven directly with aramid thread. Cotton in denim dilutes the impact of aramid, even though this gives nearly complete protection.
Spidi J&Dyneema Jeans
Dyneema is 60 percent, cotton is 38 percent, and elastane is 2 percent in this pair of jeans. Because they are authorized to prEN17092:2017 Level AA, there is no need to worry about the outer layer wearing down over time and reducing protection.
Keys, phones, and other small items can be safely stored in the pockets without fear of falling out or getting misplaced while riding. If you don’t want to buy new jeans because yours have worn out, you can have a tailor or modification business replace them.
The zipper in the front has a large metal button. They also contain belt loops to be adjust even further if necessary. The cloth has considerable flexibility, ensuring a snug fit and a secure closing.
A full day at the office may not be possible with unlined jeans because they are warmer and heavier than typical trend jeans. While cycling, they do a great job of reducing the effects of wind and gusts. They’ll never be warm enough for winter, but they’re ideal for late spring and early autumn rides.
As a way to keep the CE-approvedarmor in place, reduce friction between denim and skin in the event of a road incident, and improve comfort and provide a cool-feel lining against the skin, the lining extends all the way down to the knees on both sides of the waistband. It is necessary to make an armor pocket from the lining of the knee armor.
Obviously, motorcycle-specific pants trump wet overalls. Andes V III trousers are pricey compared to cheaper or even high-quality options from manufacturers like Richa.
Their design is both practical and elegant. No flashy logos or colors. The model name and vent locations are dark greys printed. It is patterned in dark grey just below the waist. “”Direct Ventilation“” is published in the same color next to the vents. No blinking.
The cargo pockets are also small and unnoticeable, but they are perfect for storing your wallet while riding. Alpinestars distinctive waterproof membrane, “Drystar,” is embroidered on the left knee, with two curving reflective strips on the sides. The trousers have a modest flare around the foot to help put on bike boots.
Alpinestars Andes V3 Drystar
There is no zip, simply additional fabric and a velcro strap for a custom fit. Remember how much room you need to get your boots on and off behind your pants.
One of the most essential features of this motorcycle PPE is the carefully made thermal liner. They call thermal liner attachment tabs “Tech Liner Connection“” in red to help you discover them. The thermal liner keeps me warm on lengthy rides and has no visible stitching.
The pants include a premium zipper, hook, and button-back fastening (which has the Alpinestars logo pressed on it, excellent). If you’ve, you’ve gained a few pandemic pounds during the recent lockdown, buttons alone won’t keep your pants closed.
The cargo-style knee pockets are also closer. This design uses velcro flaps instead of zippers. Take your toll card or wallet. Who wants to mess with a toll zip? If you need to keep something dry, tuck it in one of the hip pockets with sophisticated waterproof zips.
The Drystar membrane utilized here is identical to the Apex gloves”.
The Andes IIIs thermal liner keeps you toasty, the Drystar membrane keeps you dry, and the overall comfort stays focused.
The CE A certification is standard for touring trousers. A textile thick enough to get a AAA rating would be impossible to move in. Alpinestars Bio-Armor Knee Armour is CE EN 16211 certified (Alpinestars does not specify level 1 or 2).
Jeans are a popular choice for motorcycle riders, as they are for most of the population. So, it’s a significant deal to design motorcycle clothing that looks and feels like jeans while you’re not riding. Straight–leg, 5-pocket Reax 215 Denim Riding Jeans are what they appear to be. Even with the optional Rokker D3O Knee Armor ($30), Reax’s 215s is one of the Kevlar jeans in this list of best Kevlar jeans for motorcycle riding.
Reax 215 Jeans
The Reax 215 Denim Riding Jeans are crafted from 11.5 oz 100percent cotton denim in Portugal, so they feel like any other pair of jeans. While the denim will wear out, aramid twill will keep the pavement’s rough surface away from your flesh long after the denim has. Additionally, the main seams have been triple-stitched.
Aramid layers don’t breathe like denim when hot outside, so they’re not as relaxed as plain denim.
Riders who need a longer inseam will have to look elsewhere for a pair of 215s. You can have the leg hemmed or roll it up, exposing reflective cloth on your inside leg cuff. Alternatively, if you’re moving around, just leave the legs alone. Fit is similar to Levi’s zipped regular jeans, and the waist sizes span from 28 to 42 inches.
The Street & Steel motorcycle jeans have a more straightforward design than the other ones on this list of best Kevlar jeans for motorcycle riding.
The denim is famous for its 12-ounce stretch. Even though stretch denim is outside the motorcycle world, the added mobility is enormous. The fit and style of the Oakland jeans earned a few complimentary remarks that were completely out of the question, which was really encouraging. The lack of seams on the legs contributes to the clean aspect of the jeans.
Street and Steel Oakland Jeans
Street & Steel employs aramid for abrasion protection within the jeans, a somewhat ambiguous phrase. It can be used for ballistic–rated military body armor or substantially less protective. According to Street & Steel, Aramid is “heat and tear-resistant” on the Oakland jeans. I really don’t want to learn how protective they are of each other.
Seat, hips, and knees are areas where the aramid is most likely to be needed. Adjustable or removable CE–rated knee guards provide impact protection while allowing freedom of movement (not recommended). They weren’t there, and I have no reason to remove them.
Fit for the Street & Made of Steel and 501 CT Levi’s are the same as Oakland jeans. The inseam on all Oakland jeans is 33.5. These pants are cuff-able, and they have enough room in the lower leg to wear over boots if you’d prefer. Again, these are stylish motorcycle jeans that provide adequate protection for my daily commute and occasional off-roading.
Rokker, a Swiss manufacturer, is famous mainly as at the forefront of single-layer jean development. Both their Revolution jeans and their City chinos, both of which are waterproof, are excellent pieces of clothing. For their industry, they are both the standard.
However, they are tales for another time. We’re going to tell you all about their incredible Rokkertech jeans in this review.
Rokkertechs can’t withstand the rain. They have a look, feel, and wear of acceptable denim jeans. If you’re looking for high-quality denim, think of the jeans you wore 20 or 30 years ago.
We’re referring to long-lasting jeans that you can wear for years at a time. Most current pants on the high street are only as strong as leggings.
The opposite is true when using a set of Rokkertechs. You can fold them up effortlessly, and they are still very light. However, they appear to be tough and capable of taking a lot of abuse, which they are.
Rokker Rokkertech Single Layer Jeans
Armalith is the name given to the substance features in Rokker’s Rokkertechs. Armalith is highly durable; a video of a Hummer being pulled up by a pair of Armalith trousers can be found on the internet. I’m not sure if it’s necessary or how that would compare to other types of jeans. However, it was surprising.
These jeans don’t need to be cleaning. Dark indigo is their color. In reality, they have a “raw” appearance. If you’re a fan of denim, you’ll understand what I mean. For the most part, you’ll have to take care of them and wash them just when necessary.
But if you take care of these jeans, they will develop a distinct patina that will only be yours and yours alone if you take good care of them.
The knees and hips of the jeans protection is of D3O armor. In terms of protection, it’s the best, and it’s the most comfortable. After absorption of body heat, it becomes softer and more malleable until you no longer notice it’s there. Because it complies with the CE standard, there is no compromise on the product’s safety or protection.
Even though these jeans cost $360, we believe they’re well worth the price. These are more affordable than a pair of high-quality leather pants, yet they’re still far more helpful. Because no other riding jean is like them, it’s impossible to draw any comparisons.
The material of this 12–ounce denim that’s lightweight and durable. It features an aramid fiber liner that protects the seat and the front of each leg from the waistband to just below the knee. Extra impact protection is provided by a set of detachable CE Level 1 knee armor.
With additional hook-and-loop patches and adjustable pockets on the knee armor, this is adjustable by an inch to fit the wearer’s height if necessary. Removable hip armor compartments are compatible with optional Fly Barricade CE Level 1 armor ($23.95) in the right front pocket.
Fly Racing Resistance Jeans
Denim contrast stitching and plaid patterning in the waistline and pockets add traditional styling touches. It has a long-lasting YKK zipper and riveted front pockets for further durability.
With a variety of standard and tall sizes, Fly Racing has attempted to accommodate riders with a variety of body types. As for me, I’m still wishing for an extra inch because of my long inseam (I’ll leave it to you to add the punchline).
The straight-cut leg and loose fit make it easy to wear over most boots, even the biggest ones.
I’ve been living in a pair of Resistance Jeans throughout the summer. They’re both breathable and protective in hot weather, keeping you cool and looking excellent. To top it all off, they wash far better than some of the more expensive clothing brands I own. The best part is that they were only $129.95. I suppose it’s possible to get more for your money.
Bike riding necessitates a great deal of leg mobility; therefore, jeans that make this easier are definitely worth considering for your shopping list. Your performance and the performance of your bicycle will be negatively affected if your clothing is too loose. All the vulnerable areas, such as the hips and knees, need additional cushioning.
If your jeans contain stretch panels, you’ve found one of the best Kevlar jeans for motorcycle riding, and you shouldn’t pass them up.
With the help of other rider gear, motorcycle jeans are a need. Riders who wear protective equipment around their hip and knees will be more likely to survive. When deciding, don’t forget about the armor or the pads.
Detachable safety compartments are available on the majority of models. that dear reader is a terrific combination if you wish to wear the jeans as casual wear.”
Cordura Kevlar and Aramid fibers are good for boosting the jeans’ looks, durability, and protection. This is a great feature to look for in your jeans if it is on a significant portion of the structure. It has earned our endorsement as the most fabulous pair of biker jeans available.
The price of a pair of rider jeans is always a consideration for motorcycle clothing. On the other hand, if you’re on a tight budget, this list does include some promising options. The safety measures may be weakened despite the meager budget.
We recommend spending a little more money on the fabric and other essential safety measures. As long as the jeans aren’t too pricey, you’ll get a good return on your investment.
If something isn’t going to be of many benefits to you, don’t spend money on it. Make a list of the characteristics you want in your rider gear before you buy so that you don’t waste money on features you don’t need.
An essential piece of clothing is biker jeans. Because of this, the best Kevlar jeans for motorcycle riding are durable enough to provide you with plenty of wear and tear before your money’s worth is recouped from the purchase.
Equipping yourself with equipment that is both safe and convenient is a must. Aside from being extremely wearable, the jeans on our list of best Kevlar jeans for motorcycle riding also represent excellent value for money. We wish you luck in your search for the ideal pair of shoes!
Due to global emissions rules, many motorcycle manufacturers have been forced to retire models in recent years. As the YZF-R6 supersport and the Evo-powered Sportster are dropped from the European market. It is due to evolving standards shaping the motorcycle industry.
Upcoming pollution restrictions in Japan threaten to wipe off many more motorcycle models. It can worsen the situation. To keep pace with the European Union’s Euro 5 framework, Japan will enact more strict regulations starting in fall 2022.
CO2 is the cause???
Ten per cent of the almost 190 models provided by Japan’s Big Four will be axed by the Japanese media site Nikkei. Among the 80 models that Honda now offers are the venerable CB400 Super Four and ten others that will be phased out by Honda alone. Additionally, Big Red is said to be working on Gold Wing variations and Benly scooters.
Honda and Sony sealed EV deal recently
Yet, Honda is not the only company that has reduced its product portfolio. Yamaha’s FJR1300 tourer is scheduled to be discontinued, while Suzuki may abandon five models. It includes the GSX250R sportbike. While Japanese carmakers can sell their non-compliant cars elsewhere. It’s difficult to imagine them putting resources into such attempts in the long term.
Japan’s Big Four electric?
For the time being, Honda’s goal is to electrify its whole range of vehicles by 2040. So, Yamaha aims to achieve carbon neutrality by the year 2050. Catalysts aren’t only emissions standards. Because of continued supply chain and resource constraints, the Big Four are considering increasing their electric motorcycle and scooter output.
Catalytic converters are designed to cut CO2 emissions by various manufacturers. Rare metal costs have lately risen, making it even more difficult to develop and produce catalytic converters. It’s possible that eliminating 20 models from Japan’s Big Four lineup may impact sales while also hastening the shift to electric and alternative fuel motorcycles. For more news and updates keep visiting BikersInsider.
The next iteration of the Yamaha R1 sportbike might be unveiled before the end of the year. According to paperwork submitted to racing’s FIM regulatory body.
Although the current model of the legendary sports bike has been on the market since 2015. A major revamp of the R1’s mechanicals has been in the works for some time now with Yamaha’s range of motorcycles. It includes the recently redesigned MT-10 naked bike. MT-10 bike shares many mechanical components with the sports bike.
While this might state that Yamaha is preparing a model. The R1’s increasing age suggests that a new generation of the motorcycle is in the works.
Technical specifications
Though Yamaha’s 998cc four-cylinder engine will feature in the papers. It is unclear whether the company will be able to squeeze out more horsepower than the present 197bhp. Either they are planning to compete with motorcycles such as the Honda CBR1000RR-R.
Recent patents filed by Yamaha reveal that the company is working on a seamless gearbox inspired by its M1 MotoGP machine. If the engine specs seem similar, Yamaha may be keeping its “party trick” for the transmission rather than the engine.
While traditional manual transmission features in sports bikes. The ‘automatic’ version is more found on cruisers and touring motorbikes. Sportbikes may also enjoy a seamless transmission since it provides more stability and usability. It makes models like the R1 more versatile daily. It may be difficult to replace a bike that has won three major motorcycle racing championships. Any upcoming R1 will have to do it with considerable weight on its shoulders because of its age relative to its rivals.
Expected reveal
Alternatively, the YZF1000W denotation might reflect a racing-only version of the current generation R1 that will appear to compete in 2023, freeing up room for its successor down the road.
If a new R1 is on the way for 2023, we expect to see it introduced around October of this year. For more news and updates keep visiting BikersInsider.
You may recognize Chinese motorcycle maker QJ Motor as a partner or parent firm for Benelli and other Italian brands like MV Agusta. QJ Motor has redesigned the 600RR for its 2022 generation. Since its introduction in 2020, the 600RR has been QJ Motor’s first four-cylinder-powered model. It incorporates the foundations of the Benelli TNT600i into a sportbike package.
Design and Build
The reworked front fascia immediately reminisces Ducati’s distinctive appearance. As for its side profile, it’s identical to the Honda CBR650R sportbike.
Only two kilos have been shed off the 600RR’s dry weight, bringing it down to 213 pounds, which is still a bit on the hefty side. For added range, QJ Motor has increased the motorcycle’s tank capacity to 18 gallons. The bike’s rear end also features a more angular and higher tail part, keeping modern sportbike design trends. According to QJ Motor, if you’re going at an average speed of 93 miles per hour, the winglets will provide between 5 and 6 pounds of downforce.
Specifications
When it comes to power and torque, the engine of the new 600RR isn’t much different from the previous model. A new exhaust design with lowered back pressure and an internal engine friction reduction of 5 percent are the primary reasons for this. As a result, at 11,500 rpm and 10,500 rpm, the engine now produces 87.2 horsepower and 56 Nm (39 ft-lbs) of torque.
A preload-adjustable monoshock at the rear and an upside-down front fork are the only options available. With two 4-piston Brembo mounted calipers at the front and a two-piston Brembo caliper at the back, the brakes are rather good. Some electronic rider aids are also included with the 600RR. A quickshifter that only works on upshifts are included as well as ABS, traction control, and riding modes. Also included are a TFT screen and a USB C port.
Since QJ motor owns Benelli, it’s workable that the 600RR will serve as the basis for a new Benelli model. According to previous Benelli hints, we should expect the Tornado 650R to be based on the QJ Motor 600RR. With increased displacement, tweaks to the bodywork, and Benelli’s famous Lion of Pesaro badge.
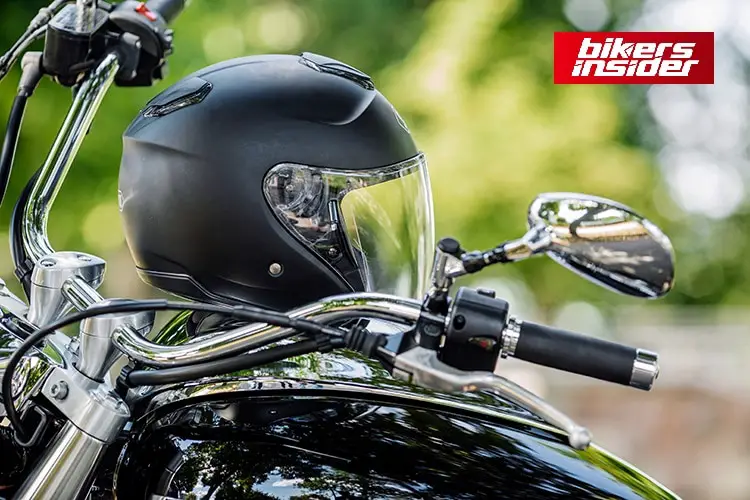
There are many different styles of motorcycle helmets, and not all of them are made in the same manner or meet the same motorcycle helmet standards. A helmet, which appears to be the most basic motorbike gear, is vital to a rider’s safety. Wearing a helmet in a motorcycle crash decreases the risk of brain injuries by about 70%. According to the NHTSA, it reduces the risk of death by 30%. It’s now more crucial than ever to know how protective your headwear is.
DOT, SNELL, ECE, and SHARP stickers are undoubtedly on your helmet. But did you know these stickers represent the quality of your motorbike helmet? Before receiving a safety rating, each helmet is subjected to many safety factors, including impact testing. A motorcycle helmet rating certification specifies the extent of protection a helmet provides.
helmet and motorcycle
How many helmet standards are there in the market?
You’ve seen a variety of stickers on the rear of your helmet if you’ve spent any time looking at it. One or more of these stickers may be seen on your lid and or show various certifications:
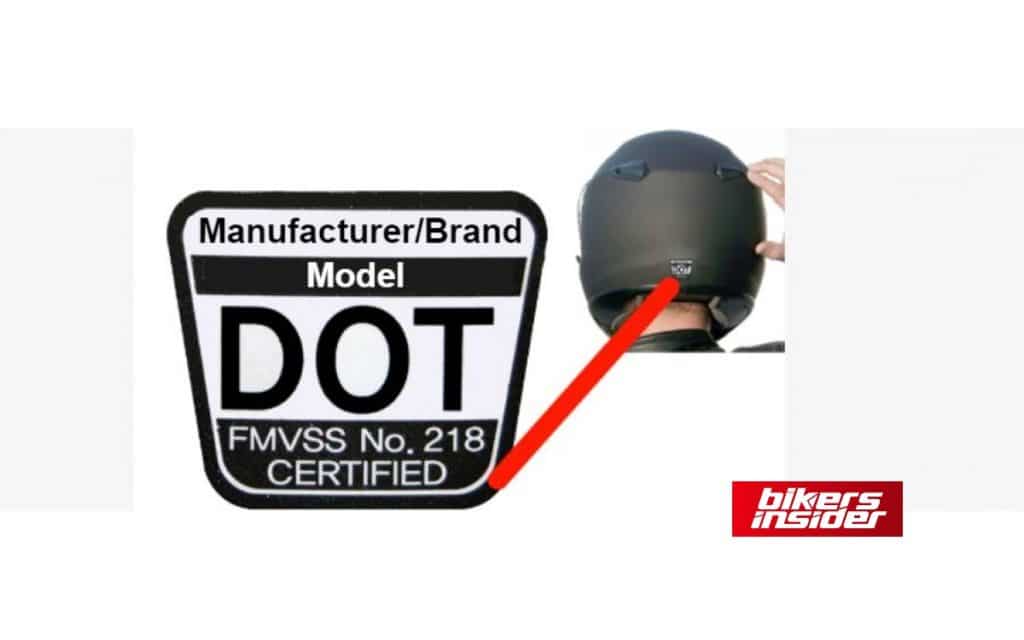
The federal standard FMVSS 218 is the current DOT rating. Any helmet with the DOT sticker must follow this standard (more on that later).
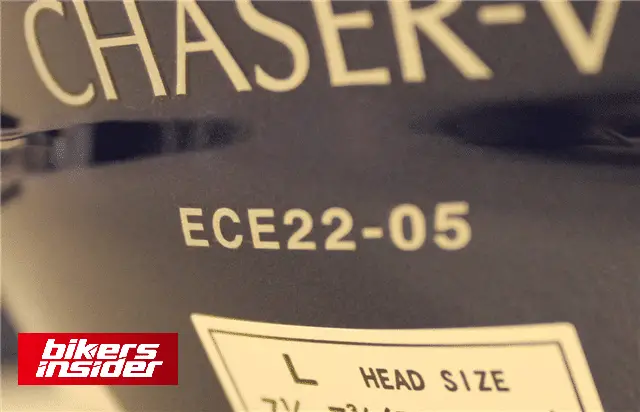
Economic Commission for Europe (ECE) motorcycle helmet standards
More than 50 European nations adhere to this international standard. Thus, any helmet bearing this label must meet the most recent ECE 22.05 and from July 2022 ECE 22.06.
The Snell Memorial Foundation
The Snell Memorial Foundation sets the SNELL motorcycle helmet standards. Only a few racing organizations demand this type of testing, and it is always done. SNELL M2020 is the current standard for street usage.
Motorcycle helmets that fulfil the safety of motorcycle helmet standards set out by the world’s largest motorcycle racing organization are given the FIM rating, which is a new grading system.
Certification stickers on helmets
Please make sure the sticker on your helmet shows that it’s a helmet and not a salad bowl before you get on the bike. The term “novelty” helmet refers to genuine helmets that don’t have a DOT or ECE label. These are dangerous, offer no protection, and are thus unlawful to wear when riding in regions or conditions where a helmet is required by law.
So, you may have an ECE-certified helmet, or even one that meets all three criteria, depending on your picks.
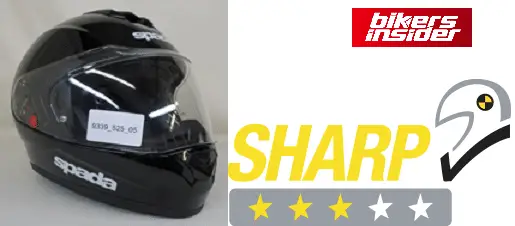
The motorcycle helmet industry has recently seen the entry of a fourth testing agency. Instead of certifying helmets, the SHARP method offers a “star rating” to European-made helmets.
Helmets are essential gear for motorcycling.
Every year, motorcycle helmets help save the lives of countless individuals. Many motorcyclists would still be alive today if they had been wearing a helmet.
Choosing a full-face helmet instead of an open-face (jet) helmet is preferable because full-face helmets are better. Crash victims frequently hit their chins and faces when riding motorcycles. There is a 45 per cent chance that an impact to a motorcyclist’s head will occur on the part of the head that only a full-face helmet covers.
Know your helmet
With some knowledge of helmet design and construction, you can make a better purchasing decision. This is because some helmets are better than others.
No one standard is better than the others; rather, our goal is to explain how motorcycle helmet standards compare and where they are applicable. These motorcycle helmet standards are not mutually exclusive; some helmets have numerous certifications.
The following is a breakdown of each standard’s requirements.
DOT motorcycle helmet standards
The Department of Transportation (DOT) of the United States evaluates whether a helmet is safe to use. It is one of the most fundamental helmet requirements. The Department of Transportation (DOT) is a government agency. So, helmet manufacturers put their products through rigorous testing and refinement. They ensure that they exceed DOT safety bars.
Helmets that have been certified by the DOT must meet various criteria. It includes a wide FOV, resistance to penetration, impact negation, and more. Federal Standard FMVSS 218 appears on the helmet as a tag provided by the Department of Transportation (DOT).
DOT label on back of a helmet
Testing method
Helmets that are DOT approved have undergone two rounds of testing to withstand the impact of a collision. A penetration test with sharp items is also performed to check the helmet’s shell. The test helmet is dropped from a height of 1.83 meters to create a G-force of 400G during the fall on two different surfaces.
As a result, scientific instruments are used to assess the effect. Loads of 22.7 kg are applied for 30 seconds, then raised to 136 kilograms for 120 seconds to test the strength of the helmet strap under stress.
Unfortunately, FMVSS 218 is one of the few standards that has not been tested by the issuing body. Independent contractors are hired to randomly test helmets to spot any defective ones.
PROS
Scheme for high-energy testing with two blows per spot on a hemispherical anvil.
Technicians can hit the helmet at any point within a vast region.
400 g of maximum permissible energy transfer is a good value.
CONS
“Honor system” random testing is ineffectual, and many helmets marked DOT may not genuinely pass the standard.
The usage of a small number of head forms
Non-impact energy management testing is a little scarce: insufficient research on critical aspects like optics, removability, friction resistance, and many others.
ECE 22.05 motorcycle helmet standards
ECE 22.05 stands for “Economic Commission for Europe.” Guideline 22 provides the basic standards for motorcycle and scooter helmets. More than 50 European countries use them. ECE 22.05 is a somewhat new standard compared to DOT FMVSS 218. Yet, it ensures that helmets will be subjected to more thorough and rigorous testing. Most major motorsport organizations, including MotoGP, Formula One, the AMA, and CCS, have accepted ECE certification.
Every vehicle’s safety system component must pass rigorous ECE-approved testing to receive this certification. The lower average motorcycle accident speed in Europe has a considerable impact on the development of ECE impact testing. A smooth anvil is used in ECE tests to administer a lower-energy hit than the Hemi anvil (the Hemi anvil is used in DOT and SNELL). Besides, ECE clearance testing involves a single impact on fixed points rather than the usual multiple-hitting within set spots.
ECE 22.05 label on back of a helmet
Testing
More ECE 22.05 certification testing includes abrasion resistance testing. A high load retention test of more than 300 kg and chin strap slippage. Instead of self-testing as DOT certification requires, the helmet must undergo ECE certification testing before being sold. Before an ECE helmet certification can be issued, independent agencies must first test it with representatives.ECE 22.05 helmets are tested in different countries.
The difference in US and European collision speeds
There are considerable differences in motorcycle collision speeds between the US and Europe. This is an essential factor in the design of ECE impact testing.
Here is a single blow in the ECE impact tests, which results in a low-energy testing system. Yet, ECE tests need technicians to strike helmets at predetermined locations. Unlike the other two standards, which enable technicians to crash helmets anywhere within a range. It allows helmet companies to “game the system” by improving protection to pass a dangerous helmet at certain spots.
PROS
All ECE-certified helmets are rigorously tested to ensure compliance with the standards.
Only a small amount of peak energy is permitted (only 275 g)
Comprehensive testing for a wide range of safety-related functions.
More variables may be tested with eight different head forms.
CONS
Testing using a curbstone anvil and a single hit results in extremely little energy, which may be inappropriate for American speeds.
The impact testing may be cheated if the striking helmet positions are predetermined.
Testing with a variety of head forms can result in a shifted centre of gravity, resulting in a 20 per cent reduction in impact energy.
Snell (Snell Memorial Foundation M2010) motorcycle helmet standards:
The SNELL Memorial Foundation has long been the darling of the helmet industry. It is still regarded as the gold standard for helmet safety. An edge anvil profile is used in SNELL M2020 certification and requires 275 g most energy transfer after two impacts. The extra testing for attributes like stability and simplicity of removal in an emergency reflects the fact that SNELL testing is developed with the racetrack’s energy levels and safety needs in mind.
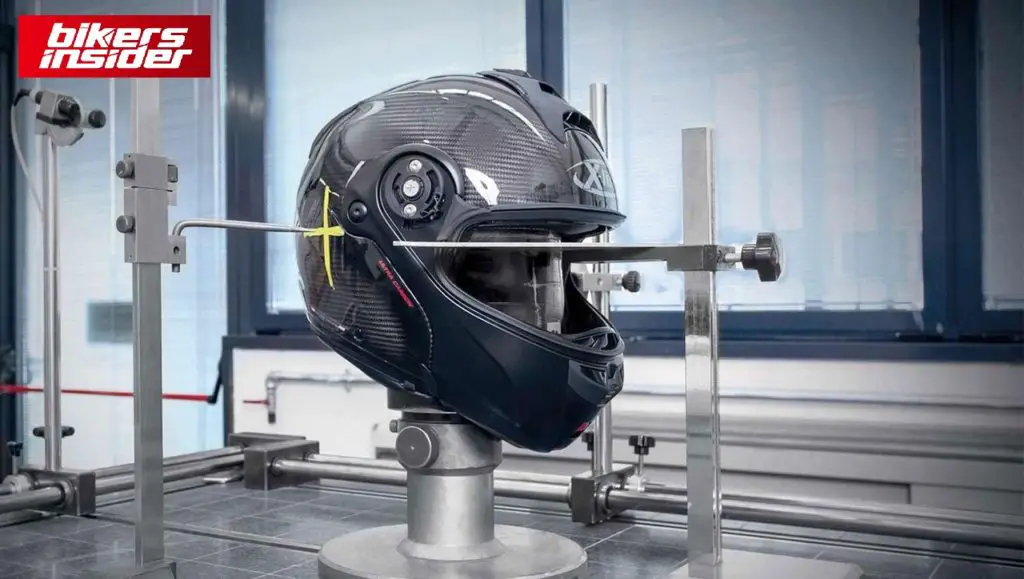
The helmet technician’s significant degree of control over the testing procedure. It sets SNELL apart from other helmet standards. Technicians at SNELL seek the helmet’s weakest spot. Such as a metal visor snap or mechanical hinge, focusing their testing on that area. Technicians will test the helmet’s energy-management capabilities in several places. They are convinced that they have obtained an accurate indicator. There will be a “helmet autopsy” when the EPS liner and other internal components are examined. It is for indications of weakening to ensure that the helmets are safe.
Snell Foundation
SNELL M2010
SNELL’s M2010 standard was criticized for pushing “overly hard” EPS liners. The liners were rigid enough to allow for increased force transfer at lower energy hits to achieve the SNELL criteria for higher energy impacts. In principle, this was a good plan. But in actuality, the argument didn’t stand up very well. The three anvil forms used by SNELL testing are flat, hemi, and edge. Aside from its severe (and high-energy) state, the flat anvil is identical to that employed by the ECE and DOT. Helmets that enable more than 275 g of energy transfer during a flat anvil hit are considered “too hard” to be safe in low-speed accidents.
PROS
All SNELL-certified helmets go through a rigorous testing process.
Only a small amount of peak energy is permitted (only 275 g)
Stability, detachability, and face shield breaking testing
Intense impact energy is tested on an “edge” anvil.
Helmets are thoroughly inspected by technicians to provide the best possible testing.
CONS
As private SNELL testing costs rise, so does the selling price of helmets that have been certified by the organization.
Some SNELL helmets may not be suitable for street usage because of their racing focus (internal sun shield, most modular helmets)
UK SHARP Motorcycle Helmet Certification
The newcomer to the helmet safety game has taken things a step further by awarding a star grade. It is based on the helmet’s performance in variousxus impact locations and energy levels.
To put it simply, SHARP is an impact rating upgrade of the ECE 22.05 standard. It is why SHARP evaluates helmets that have before passed ECE certification. SHARP assigns a “safety rating” to each part of the helmet based on European crash data.
SHARP logo
Helmet buying community’s reservations about SHARP
Much of the helmet-buying community has reservations about SHARP. SHARP‘s more rigorous testing techniques, the colour-coded “zone” breakdown of each tested helmet and the “star rating” system are all applauded by advocates of the safety program. They believe that SHARP’s “star ratings” oversimplify a complicated issue like helmet safety. The colour-coded ratings based on one impact site in a zone do not consider the array of variables in a motorbike incident and are thus inaccurate.
No matter how you feel about the SHARP safety program, keep in mind that it was created for the European market. Keep in mind that the helmet evaluated by Sharp may be substantially different from the one you’d buy if you’re looking for a DOT helmet.
PROS
Unlike any other testing method, helmets are subjected to high- and low-velocity impacts.
Extensive impact testing was conducted.
Helmets have five places of impact.
helmet autopsy is performed after a collision to look out for any weak areas
Many consumers prefer rating systems beyond the standard “pass/fail.”
CONS
Critics argue about the usefulness of “star” and “color code” grading systems.
Testing based on European crash data ignores the varying energies and riding circumstances seen in the United States.
Curbstone and flat anvils are used instead of DOT or SNELL-regulated hemi anvils to simulate lower energy levels.
ECE 22.06 will replace ECE 22.05 in the near future
As of June 2020, ECE 22.05 will be replaced by ECE 22.06, and the.05 or.06 refers to specific changes and updates to the No. 22 regulatory framework. Twenty years ago, in June 2000, ECE 22.05 was put into place.
In the last 20 years, motorcycle helmet manufacturers have seen tremendous technical, design, and engineering developments.
Implementation of ECE 22.06
As a result, new adjustments must be made to accommodate the slew of new features and materials found in helmets. Companies have until January 2024 to build helmets that match the new criteria, which provides them plenty of time.
ECE 22.06 Testing
When ECE 22.05 comes into effect, helmets that satisfy that standard will still be legal to sell as new. New helmets supplied by a manufacturer to a distributor or store must be ECE 22.06 certified after January 1, 2024. However, you can continue to wear your current ECE 22.05 helmets. Currently, stores may continue to sell ECE 22.05 helmets after this date, although this may alter in the near future.
Conclusion
There are many aspects to consider when purchasing a helmet, and selecting the proper safety certification is only one. Several factors contribute to the overall safety of a rider, such as a helmet’s fit, quality, comfort, simplicity of use, and feature set. Fog-free glasses and lighter, quieter helmets are two ways to make riding more comfortable and less exhausting for the rider. These safety elements may help prevent accidents from occurring in the first place.
The importance of proper fit cannot be overstated! In fact, all four testing organizations emphasize the need to use head forms that fit correctly throughout testing. The effectiveness of your helmet in absorbing impact energy will be hampered if it does not work properly. You are safe with a $100 DOT helmet that’s the proper fit than a $900 SNELL helmet that’s too big.
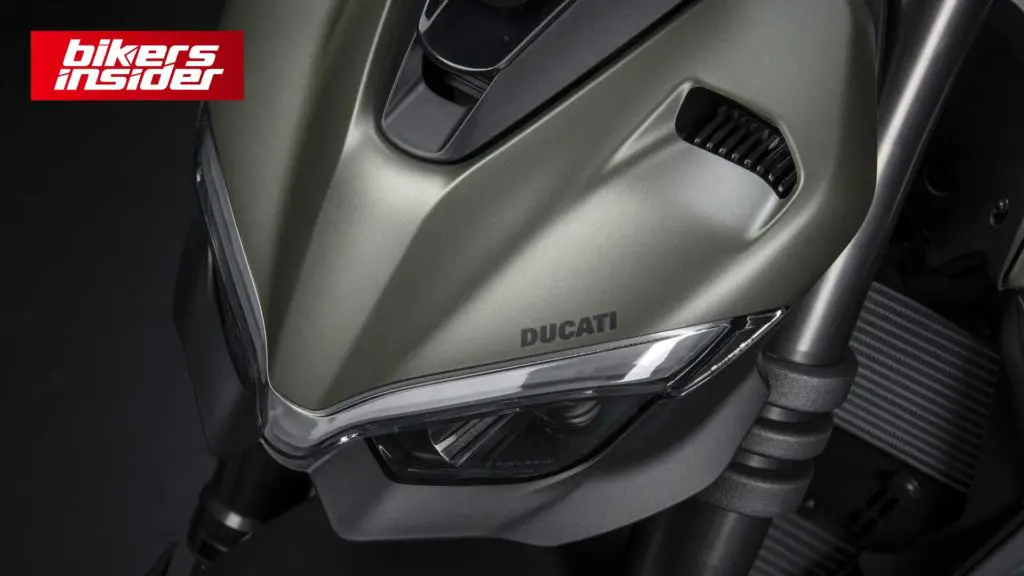
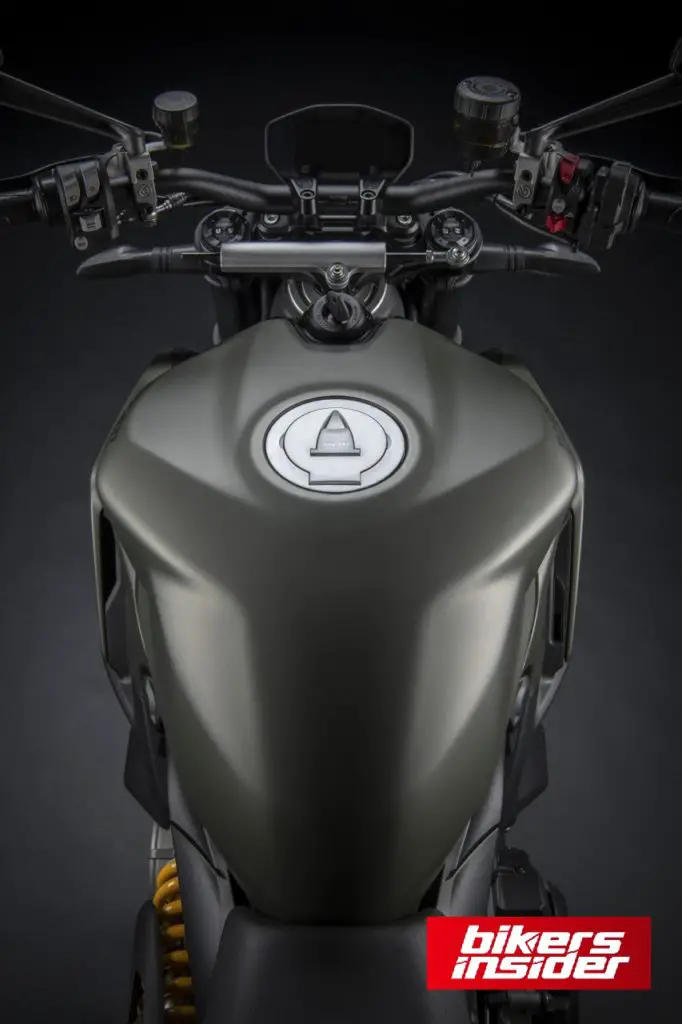
Even in Ducati‘s typical red color scheme, it can be difficult to tell the Ducati Streetfighter V2 from the Streetfighter V4. It is due to the similarity of its headlamp clusters, body panels, and single-sided swingarms. These distinct trajectories are further cemented by the new Storm Green paint scheme on the Streetfighter V2 of 2023. It is more stealthy than the 2021’s and 2022’s versions of the V4 SP.
The concept behind the color scheme
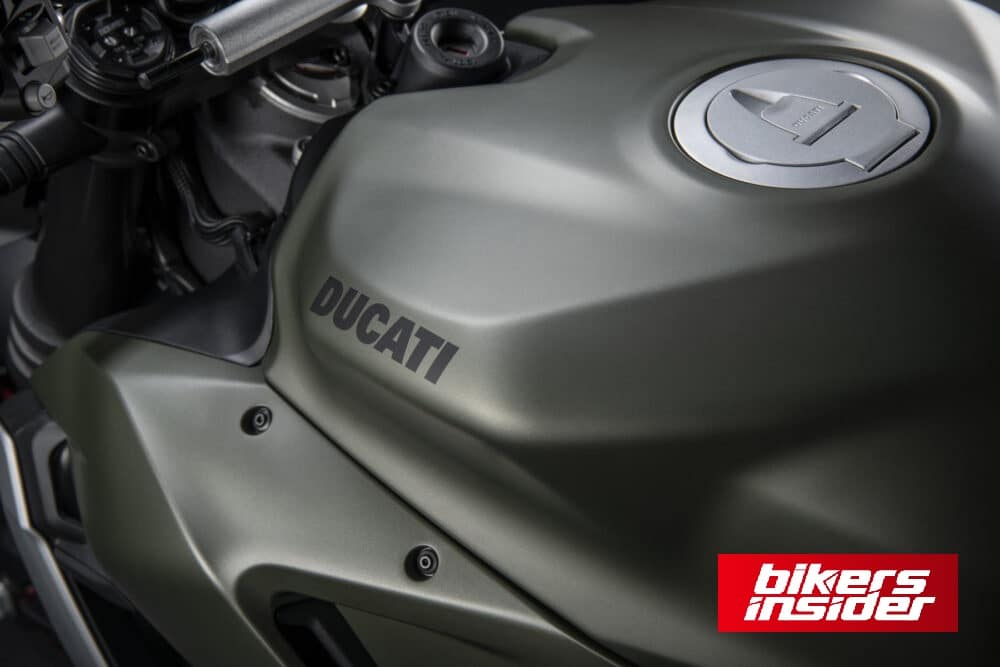
Ducati’s Centro Stile (Styling Center) had a specific goal when they created the matte metallic fatigue green color choice. “The metallic grain creates a very evident play of contrasts” while the matte surface couples with “the chromatic context of the mechanical parts,” according to the Bologna business. Ducati, but couldn’t resist a dash of crimson, with red rim tape referencing the brand’s racing history.
2023 Ducati Streetfighter V2 fuel tank and side panels
Specifications
The Streetfighter V2 retains the same road-oriented ergonomics and aesthetics. Even despite its fresh paint job. The Streetfighter’s handlebars are higher than those on the Panigale V2. It reduces the strain on the wrists. It has a longer, broader seat, and lower footpegs make the cockpit more comfortable. Superquadro V2’s 153 horsepower (at 10,750 rpm) and 74.8 lb-ft of torque remain, as does the 955cc, Desmodromic, 955cc Superquadro V2 (at 9,000 rpm). Increased rear-wheel torque and throttle responsiveness can use a 15/45 final gear ratio.
2023 Ducati Streetfighter V2 Headlamp
This high-performance V-twin has a die-cast aluminum monocoque frame bolted to it. There is a Sachs rear shock that connects it to the single-sided swingarm. Front-wheel agility and stability come from a 43mm Showa BPF fork and Sachs steering damper. The Diablo Rosso IV-wrapped five-spoke wheels. The chassis features a Brembo brake system with twin front Brembo M4.32 monobloc radial calipers.
2023 Ducati Streetfighter V2 handlebar
Expected price
The V2’s cornering ABS, traction control, fast shifter, wheelie control, riding modes, and engine brake control are typical of Ducati, which seldom compromises technology. With only a new color, the 2023 Streetfighter V2 is bumped by $550 to $17,495.
For motorcycle maintenance, fork seals oil and bushes are one of the most frequently overlooked components. This fork oil can be used for the whole life of some motorcycles. Every two years or 15,000 miles, thank your fork with a new oil change for all the hard work it performs to make your ride smooth. You may have noticed a droplet of oil on the top of the slider during your pre-ride inspection, even if you’ve been a careful caregiver of your cruiser. Until you repair the seal, you’ll have to limit your riding time.
Even though they are merely two rubber rings, they are vital! After a long afternoon of washing and polishing, fork tubes that were freshly cleaned are all greasy and filthy after only a few kilometers of riding. If this happens to you, your fork seals are to blame. A filthy fork tube is the least of your concerns in such a situation. Road holding can be substantially compromised by ineffective damping. Still, the worst-case scenario is that oil leaks onto the brakes, causing them to fail. If you’re replacing the fork seals, make sure you do it on both sides.
How do change motorcycle forks seals?
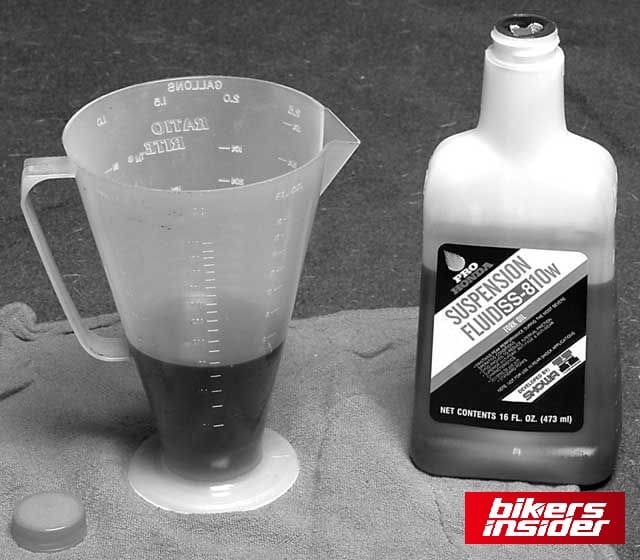
To ensure a smoother process, gather all necessary components and tools in advance. It doesn’t matter if you just need to replace one seal; you should always replace them in pairs. Most of the time, the components are less than twenty dollars. Make sure you know how much oil you’ll need before you begin. A single bottle of fork oil will not be enough, so don’t expect that one bottle per fork leg will be enough.
Your toolkit should include all of the standard fares from a mechanic’s toolbox. Bike support is also required when the front wheel is removed. You don’t have to spend a fortune on an elevator if you don’t have one. You’ll also need an oil recycling container, a Ratio Rite (for measuring the correct amount of fork oil), a Race Tech Fork Oil Level Tool, or a tape measure that fits inside the stanchions (the small-diameter inner tubes), seal drivers or a piece of PVC pipe with the appropriate diameter, rags, paper towels, and a heavy four-wheeled car.
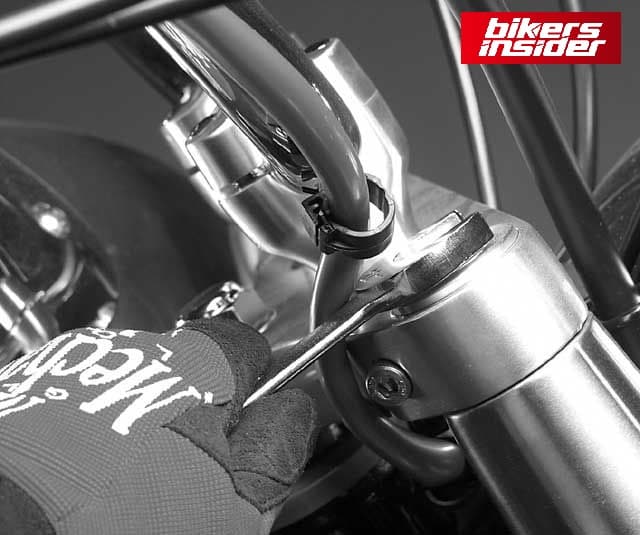
With a socket wrench, unscrew the cap. Warning: The cap may burst with considerable force when the threads disengage. Even if you’ve planned ahead, the cap may still elude you. Keeping your face out of harm’s way is critical, so aim the cap at anything solid to ensure your safety. It will be simpler to locate the cap in the corner under the mound of tarps if you cover the top of it with a thick, heavy cloth.
Removal of leg
Forks with circlip-secured caps sometimes need the use of three hands to liberate them. While the other person removes the circlip, one person applies pressure on the cap. A cloth should then be wrapped over the top of the fork to keep it steady when the circlip is removed.
Step 2: Remove the fork tube
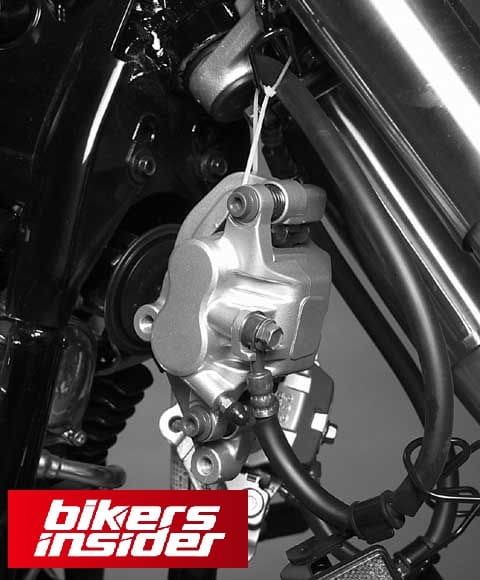
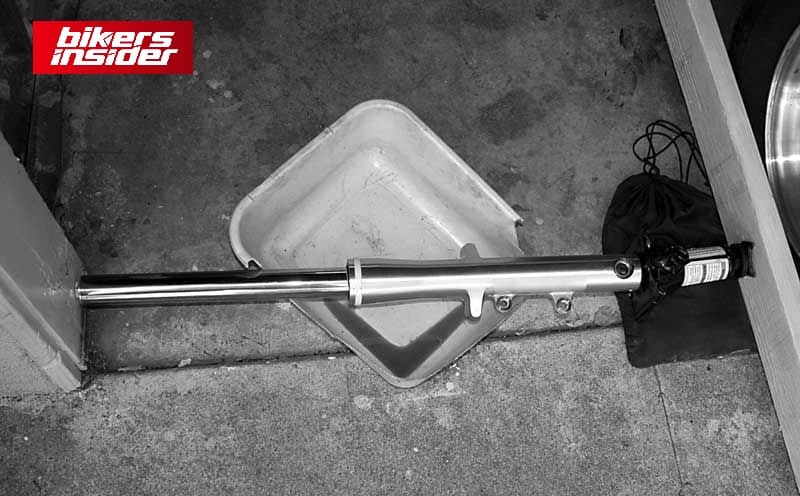
Remove the mudguard, wheels, and brake calipers off your motorbike after being jacked up. Because the hydraulic system does not need to be opened, you can simply join the calipers together on one side with insulated wire or cable. It’s time to let go of the brakes completely. Unscrew the bottom triple tree clamps and then gently twist the fork tubes out of the way.
calipers hanging from bike frame
Step 3: Removal of upper fork screw and drainage of fork oil
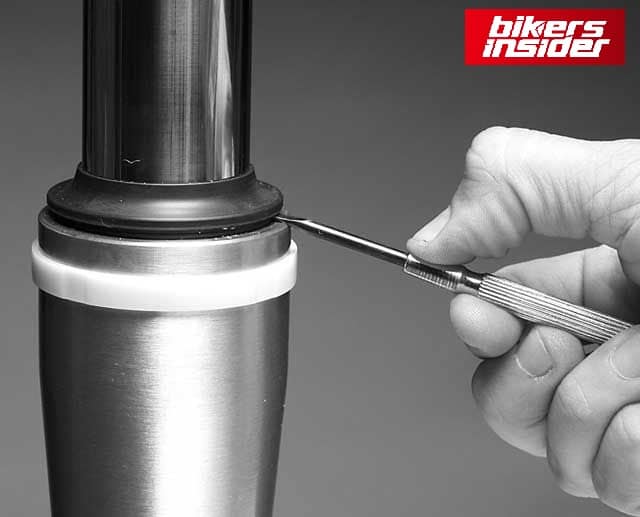
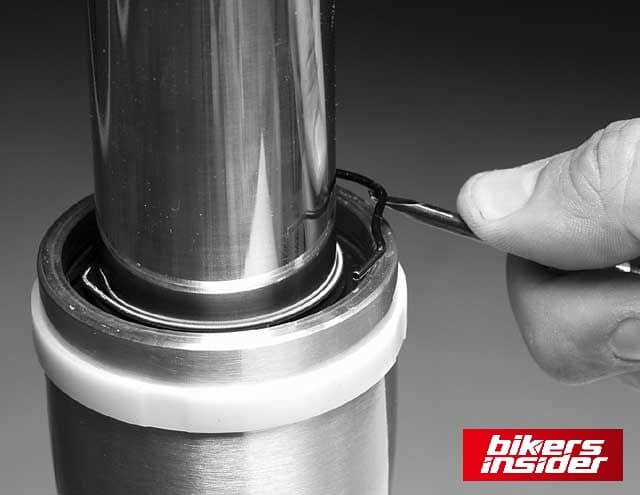
Preload spacer and washers should be removed from the stanchion and placed on a clean towel. Reassembly will be easier if they are laid out in the correct sequence and orientation. Pry the dust seal off the top of the slider using a little flat-head screwdriver. Remove it from the stanchion’s top. Remove the retaining ring from within the slider immediately above the fork seal.
Drain the oil after removal of fork cap
You’ve arrived at a crossroads. It’s time to get back to your caveman origins and use physical power to get the stanchion out of your fork seal. Drain the fork and remove the damping rod bolt from the bottom of the slider. This approach allows you to see the fork bushing to check for signs of wear. This has the drawback of requiring a substantial amount of extra effort in extra steps and perspiration.
Step 4: Opening the lower fork screw
Remove the hexagon socket screw that holds the slider and the damping rod together from the bottom. This can be a bit challenging. You must insert a suitable socket and two extension bars into the fork tube to grab and hold the damper rod as a preventative measure. If you don’t have the proper tools, pre-assembling the fork could be good. Because of the tensioned fork spring, the damping rod should not spin.
Extension of Jack
Tools you will need.
You’ll discover a sealing washer beneath the hexagon socket screw that must constantly be changed. Chromed fork tubes must be treated with the same care as a basket full of uncooked eggs! It only takes two or three miles of riding for a seal to leak again after a few millimeters of damage has been done to the fork tube. You should only use a vice to clamp the fork on the slider, such as on the brake caliper support brackets. Garages often have air impact wrenches, so you can always pay them to remove the screws if all else fails.
The dust cap’s seal is held in place by a circlip. Next, you’ll need to remove it. Pry the dust cap off with a tiny screwdriver. Then slide it up the tube and press it inward to pull it out of the groove to remove the circlip.
Step 5: Replacement of defective seals
Once the slider is tightly clamped, jolt the fork tube several times to force the guiding bushing out of the slider and remove the seal. The seal may then be removed by pulling it upwards. A guiding bushing in your fork will allow you to easily lever out the seal even if it doesn’t come out with the fork tube removed. A bike repair manual is required if you plan to disassemble the fork further, such as cleaning it and inspecting it for damage (minimum fork spring length, wear in the slider, etc.). O-rings and sliding bushings may need to be replaced while removing the fork. If you have any doubts, get the advice of a specialist before making any decisions. Reassemble the fork when it has been cleaned. Install new copper washers on the sliders’ bottoms to retain the damping rod bolts.
The replacement seal will be simpler to insert into the slider if you lubricate the seal’s outside surface and then the sealing lip to prevent damage when the fork is reassembled. Inserting the seal is best done using a professional fork seal driver, but you may also use a suitable pipe. When you begin tapping, place the old seal under it. Although you shouldn’t have to tap too hard to get the seal in, avoid using any sharp objects that might harm it. Drive the seal so far that you can use a screwdriver to push the circlip into the groove.
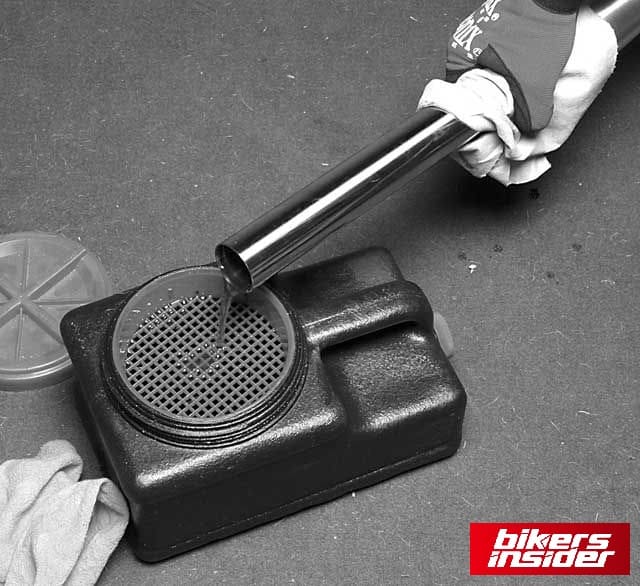
Step 6: Fill up fork oil
Use a workbench or your bike’s fork tubes to add fork oil. It’s up to you. This time, we’re going to do the filling on the bike. You must ensure that you use the correct viscosity and the correct amount of each ingredient. Not the oil, which is responsible for dampening, but the springs themselves. Using aftermarket fork springs, such as Wirth fork springs, can alleviate some bikes’ inherent chassis issues. Compared to the original, these springs have a 30 percent greater hardness rating, are type approved, and coiled progressively. Wirth springs require very little or no air assistance if your forks are air-assisted, which helps increase the life of your seals.
The proper amount of fork oil
A torque wrench should be used to tighten all the bolts and nuts on the vehicle following the repair manual. Pads need to rest on the brake discs when the brake is primed. The car may be lowered from the jack once more. Ride your bike again with a whole different perspective. After a brief test ride, inspect the fork for leaks.
How to change fork bushes?
After some time, the bushes will wear down, resulting in a small degree of play between the stanchion and the tibia. When it comes down to it, you’ll see the fork seals fail first, and since the bushes have to come out to get them out, you might replace them all.
Removal of dust seal
You can replace your weary bushes while changing the fork seals. For this purpose, you will follow the first four steps from the replacement of the fork seals section and after that:
Step 1. Remove the bushes
A flat-bladed screwdriver may be used to pry open the bottom bush, allowing it to be slipped off the bottom of the stanchion, followed by the top bush, its washer, and the oil seal.
Step 2. Removal of the stanchion and cartridge
So long as the fork leg is still attached to the bike, you should be able to remove the stanchion by simply unscrewing the top cap. Keeping the preload adjustment in place while loosening the lock nut will allow you to do so more efficiently. Then unscrew the lid, which will enable you to remove the damping adjustment rod and the damping cartridge, complete with the washer, spacer, another washer, and the spring. Keep an eye on the seat between the cartridge and the leg of the fork.
Step 3. Check for any minor issues
Using a 1200 grit emery paper and some WD-40, gently sand away any minor ridges you find on chrome fork stanchions using your fingernail. Keep sanding, but go slowly and watch for the glossy region you’re rubbing; you only want to remove the little lip of chrome, not the rest of it.
If the forks need re-chroming, go to an expert who can maintain the thickness perfectly within tolerance. Else the diameter of the stanchion could not meet the seals. Damaged stanchions need to be replaced immediately.
Suppose once the edges have been scraped off. Suppose you’re left with a hole in the chrome caused by corrosion. In that case, you really should replace the stanchion or have it professionally re-chromed. While it is possible to fill in the damage with chemical metal and then sand it down, this method is not advised and should be avoided.
Step 4. A thorough cleaning of all surfaces
Use a brake cleaner or other solvent cleaner to thoroughly clean the suspension parts, and then use a paper towel or cloth with a pokey end to wipe within the leg to ensure nothing is left behind when you’re done. Blow-dry the pieces using a compressor if possible.
Use an abrasive cloth to remove debris from the seal and clip seats on the fork leg’s top.
Removal of retaining ring
Examine for damage anywhere the oil seal could be once you’ve cleaned everything off. The fork stanchion can be straightened by rolling it on anything flat, such as a sheet of glass if you don’t have a run-out gauge. Also, make sure the spring is free of corrosion and sagging.
As the forks are separated, inspecting the bushes for signs of wear is a waste of time.
Also, make that the damper rod in the cartridge can move freely up and down; if it can’t, it has to be replaced.
Step 5. Replace the lower bush
With a flat-bladed screwdriver, slightly open the new bottom bush so it may be attached to the bottom of the stanchion. So after cleaning the bush and adding some fresh fork oil, you should lubricate the sides of each fork leg.
Step 6. Replace the cartridge
To ensure that it is mated with the bottom of the cartridge, place the seat of the cartridge in its stanchion and then slide it all the way into the stanchion. The lower bolt and sealing washer is now ready to be replaced. If you don’t have an impact wrench, you may tighten it by putting the spring back in and having a helper compress it.
Once you’ve gotten the stanchion as deep into the fork leg as it will go, apply some fork oil to the new top bush and slide it over the stanchion until it rests perfectly on top of the fork leg’s depression.
Step 7. Place new oil seal
Wipe some fork oil on the lip of the new oil seal, then verify which side up it is; the markings should be on the top face after double-checking the washer is in position above the bush. Replace the old seal by sliding the new one over the stanchion and into the fork leg’s top. Push the seal with the pipe or seal-driving tool until the groove is clearly visible for the retaining snap clip to be inserted into.
Step 8. Top up the oil
The damper rod can be pumped using a specific tool, although you should be able to do it by hand. It’s time to carefully pour in your prescribed amount of oil after squeezing both the stanchion and damper rod.
Using the damper rod, pump it up and down 10 times from the inside of the car. Then, pump the stanchion 10 times in a clockwise direction.
Step 8. Adjust the air gap
The distance from the top of the stanchion is more essential than the amount of oil. Push the damper rod and the stanchion down, then measure the distance from the top of the stanchion to the oil after making sure that all of the air is released and that the cartridge is packed with oil.
Step 9. Check the lock nut of the top cap
The damper rod’s top lock nut sets the cap’s height as it is screwed down. Rewind the rebound adjuster down before removing the top hat. Then, screw the lock nut back until it meets the cap to determine the correct setting. It’s best not to screw it in if you didn’t; instead, place the locknut back in place before reattaching the spring, such that there is 11mm of thread visible above the nut on this model.
Step 10. Put the top cap back on
Reinstall the damper cap by winding the rebound adjuster screw in until it barely contacts the adjuster rod and then reinstalling the damper cover. Just thread the lock nut back up to meet and secure the bottom of the preload adjuster in your top cap. Instead of gripping the top cap, you’ll need to counter-hold the top of the preload adjuster.
Step 11. Attach the fork cap with the stanchion
Take your fork cap and stanchion and screw them together, ensuring that the stanchion isn’t cross-threaded. The best way to do this is to use your hands to tighten it.
Step 12. Complete the procedure by tightening of the fork cap
Set the fork’s height to the top yoke’s top edge by passing it back through the top and bottom yoke. As a matter of course, both fork legs should be set at the exact same height.
Initially, only tighten the bottom yoke bolts to 20Nm, then pull the fork top caps to the correct setting (23Nm here). You may now reinstall the clip-on bars and tighten the top yoke nuts before reassembling the rest of the bike.